In previous chapters we’ve seen how graphics primitives inherit the canvas’s global state to determine their color, line-style, and position. When dealing with text, the same settings apply but are joined by a number of additional attributes controlling the font to be used and the desired layout behavior.
Basic Typesetting
Unicode strings can be drawn to specific locations on the canvas with the text() command. They can either be drawn to a point or, if the optional width and height parameters are included, word-wrapped into a block of text.
Text will be drawn in the current fill() color and uses the canvas’s current font() and layout() state to style the string. Like all graphics primitives, its position and size are expressed in size()-units and can be modulated by the current transform().
drawing text at a point
To draw some text to the canvas, simply pass a string followed by a pair of x & y coordinates defining its ‘origin’. Note that the origin point corresponds to the baseline of the text (rather than its upper-left corner). The text will be drawn as a single line unless you include manual line breaks in the string.
To draw text in typefaces other than the default, call the font() command before placing your text() on the canvas. In its simplest usage, you can select a font by passing the name of a font family, the name of a weight, and/or the font’s point size:
x, y = 24, 56
arc(x,y, 6, fill='red') # the baseline ‘origin’ pt

font('Avenir', 'black', 32)
text('München', x, y)
If you want to italicize the text (or use the ‘oblique’ variant of a typeface), set the italic keyword argument to a boolean:
x, y = 24, 24
font('Baskerville', 24, italic=True)
text('One.\nTwo.\nThree.', x, y)
drawing a block of text
The text() command allows you to typeset columns of text with automatic word-wrapping and optional hyphenation. To enable this behavior, simply pass a numerical width argument after the initial x and y parameters to set the maximium line-length before the text system will break the line.
Note that the x/y location still corresponds to the baseline of the first character and that the rendered text will be as tall as necessary to contain the entire string being drawn. For instance, typesetting a paragraph with a maximum width of 270 would look something like:
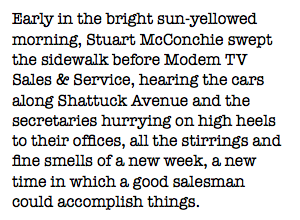
lorem = "Early in the bright sun-yellowed morning, Stuart McConchie swept the sidewalk before Modem TV Sales & Service, hearing the cars along Shattuck Avenue and the secretaries hurrying on high heels to their offices, all the stirrings and fine smells of a new week, a new time in which a good salesman could accomplish things."
x, y = 12, 24

font("american typewriter", 16)
layout(leading=1.3)
text(lorem, x, y, 270)
If your string is long enough, it’s quite possible that your text will spill off the bottom of the canvas. To constrain the total number of lines drawn you can include a fourth numerical parameter: height. When both a maximal width and height are defined, the string will be word-wrapped up to the point where the next text line would cause the Text to ‘overflow’ its maximum height.
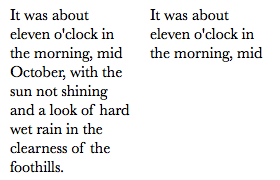
lorem = "It was about eleven o'clock in the morning, mid October, with the sun not shining and a look of hard wet rain in the clearness of the foothills."
font('baskerville', 16)

# left: fixed width, unlimited height
text(lorem, 10,20, 120)

# right: clip to fixed width and height
text(lorem, 150,20, 120,60)
The characters in the string that don’t fit within the maximum width and height aren’t ‘lost’ however. As we’ll see below you can ‘flow’ text across multiple columns or even pages (consult the Advanced Layout section for details).
optional text arguments
When you draw a piece of text it ‘inherits’ the current paragraph- and character-style, but you can selectively override these settings by passing keyword arguments to the text() command. You can call text() with any of the keyword arguments supported by the font() and layout() commands. Your alterations will apply only to that Text object and won’t affect the global state:

fill(0.3)
font('avenir next', 'medium', 32)

text('Good', 100,40)
text('big', 10,120, weight='bold', size=120, sc=True)
text('or Red', 16,155, fill='red')
When you pass a string to the text() command, you can either include it as the first positional argument or as a keyword argument called str. When using the keyword argument, the positional arguments are dedictated to setting the text’s location and size (x, y, width, and height).
This can help keep your code readable when drawing long strings that would otherwise push the coordinates off the right margin of the editor. For instance the following usages are equivalent:
text("Something very long that ends up hiding the coordinates (or at least making them painful to jump to when editing)", 100,100, 256,256, italic=True)
text(100,100, 256,256, italic=True, str="Something very long that no longer hides the coordinates (since now just the string itself is spilling off the screen)")
text alignment
By default, PlotDevice renders text with a left-alignment (a.k.a. ‘rag right’). You can change this setting by passing an align keyword argument to the layout() command to update the ‘current’ canvas state. It can also be passed to the text() command itself (to set the alignment for just that invocation).
The current alignment setting applies both when drawing to a point or into a block of text. However, the alignment’s effect on positioning is quite different depending on whether or not a width was defined for the given Text object. When drawing to a point, the text will ‘grow’ out from the origin based on the alignment setting:
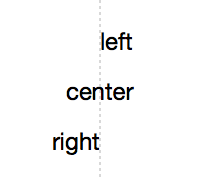
x = WIDTH/2

text("left",   x, 50)
text("center", x, 100, align=CENTER)
text("right",  x, 150, align=RIGHT)

with stroke(.7), pen(dash=3):
  line(x,0, x,HEIGHT)
When drawing a block of text, the alignment will be interpreted based on the left & right edges defined by the x and width arguments:
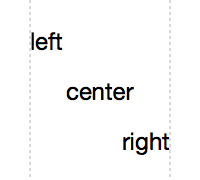
x, w = 30, 140

text("left",   x,50,  w)
text("center", x,100, w, align=CENTER)
text("right",  x,150, w, align=RIGHT)

with stroke(.7), pen(dash=3):
    line(x,0, dy=HEIGHT)
    line(x+w,0, dy=HEIGHT)
Setting the Style
The text() command simply draws a string to the screen with the specified location and size. The rendered text’s typeface, spacing, and other typographical details are specified by calling the font() and layout() commands (which roughly correspond to the and palettes found in the Adobe apps).
Character Styles
The font() command takes up to three positional arguments, allowing you to set the typeface’s family, weight, and point size. All the arguments are optional since any omitted parameters will default to the canvas’s ‘current’ font-state.
Each time you call font(), the canvas’s state is updated and an inspectable Font object is returned reflecting the new values:
print(font())                  # Font(Helvetica Neue 24pt | Regular)
print(font('Avenir', 'heavy')) # Font(Avenir 24pt | Heavy)
print(font(128))               # Font(Avenir 128pt | Heavy)
print(font('Baskerville', 64)) # Font(Baskerville 64pt | Bold)
print(font('light'))           # Font(Baskerville 64pt | Regular)
In addition to the positional parameters, font() also accepts a variety of keyword arguments for selecting a typeface, toggling OpenType features, and even tweaking the kerning between neighboring glyphs:
- Typeface selection: family, weight, width, variant, italic
- OpenType Features: sc, ss, lig, osf, tab, vpos, frac
- Font Metrics: size, tracking
The font() command works incrementally and can change as many (or as few) parameters as desired on each invocation. Note how the typeface and size can be set once at the beginning of the script with subsequent calls tweaking the style:
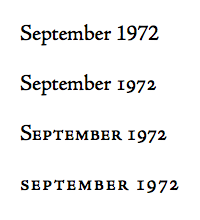
font('jenson', 'medium', 22)
text("September 1972", 20,40)

font(osf=True) # old-style figures
text("September 1972", 20,90)

font(sc=True) # small-caps
text("September 1972", 20,140)

font(sc=all, tracking=50) # letter-spacing
text("September 1972", 20,190)
Paragraph Styles
The layout() command accepts any number of keyword arguments affecting line-wrapping behavior, spacing, and alignment on a paragraph-by-paragraph level (as separated by "\n" characters in the text() string):
The most common uses of layout() are setting the text alignment (to LEFT, RIGHT, CENTER, or JUSTIFY) and controlling the inter-line spacing (measured as a multiple of the current font size):
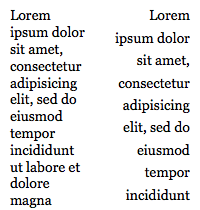
lorem = "Lorem ipsum dolor sit amet, consectetur adipisicing elit, sed do eiusmod tempor incididunt ut labore et dolore magna aliqua."

font('Georgia', 14)
text(lorem, 10,20, 80)

layout(align=RIGHT, leading=1.6)
text(lorem, 110,20, 80)
The Global Stylesheet
If you find yourself issuing the same font() and layout() commands repeatedly in a script, you can simplify your code by storing your settings in the canvas’s global stylesheet() then referring to them by name.
To create a style, call stylesheet() with a name as its first argument followed by any combination of the keyword arguments supported by font() and layout(). You can then refer to the style’s name in subsequent calls to text() without affecting the canvas’s current type style:
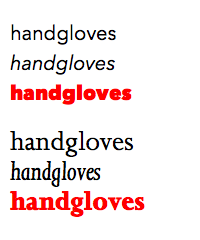
stylesheet('emph', italic=True)
stylesheet('bright', weight='heavy', fill='red')

font('Avenir Next', 20)
text('handgloves', 10,40)
text('handgloves', 10,70, style='emph')
text('handgloves', 10,100, style='bright')

font('Joanna MT', 28)
text('handgloves', 10,150)
text('handgloves', 10,180, style='emph')
text('handgloves', 10,210, style='bright')
Building Text Up
The text() command typically functions in a fire-and-forget manner – styling and drawing your prepared string in a single step. However, it’s quite common to need lower-level control over substrings within your run of text. For these more complex use-cases, PlotDevice provides a number of convenience methods for assembling text iteratively and decomposing marked-up strings.
incremental text
Each call to the text() command returns a Text object and adds it to the canvas. If you save a reference to this object in a variable, you can use its append() method to add more text to the end of the string (potentially with a different character style).
The append() method takes a single positional argument (a string) which will be added to the end of the Text run using the character & paragraph style that the Text object was created with. You can also pass any of the styling keyword arguments supported by the text() command to customize the style of your appended substring.
This allow you to build up a run of text incrementally, which can be handy when typesetting items pulled from a list or dictionary. For instance, here we create an ‘empty’ text object then iterate over a list of color names. Each name is appended to the Text and sets its fill color using the same value.
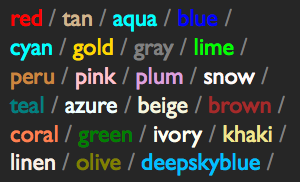
names = ['red', 'tan', 'aqua', 'blue', 'cyan', 'gold', 'gray', 'lime', 'peru', 'pink', 'plum', 'snow', 'teal', 'azure', 'beige', 'brown', 'coral', 'green', 'ivory', 'khaki', 'linen', 'olive', 'deepskyblue', ]
background(.15)
font('gill sans')

t = text('', 10,26, 280, fill=.5)
for name in names:
    t.append(name, fill=name)
    t.append(' / ', weight='light')
inline styles
When you pass a string to text(), the entire run will be typeset with the same styling characteristics. If you need finer granularity, you can use XML-like tags to mark-up the string. Tag names will be matched against the stylesheet() and any elements with the same name as a defined style will use those settings.
To enable this behavior, simply pass your string as the xml keyword argument when calling text(). Note that ‘nested’ tags will cascade their styles in a manner similar to CSS selectors. For instance, here the word ‘battery’ inherits both the ‘bold’ style and its enclosing ‘caps’ style:
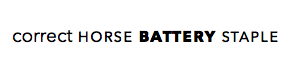
stylesheet('caps', sc=True, tracking=40)
stylesheet('bold', weight='bold')

font('avenir next', 19)
text(12,42, xml='correct <caps>horse <bold>battery</bold> staple</caps>')
You can also use tags that do not have a corresponding definition in the stylesheet(). They will not be typeset any differently from the enclosing text, but may still be useful since they can be accessed using the Text object’s select() method. In addition to providing layout-geometry information, the TextFragment objects returned by select() also provide access to any attributes defined in the start-tag.
text metrics
Since you may be interested in positioning multiple Text objects relative to one another, it’s often handy to know how much space a given run of text will require before drawing it. For this you can use the measure() command, passing a string along with an optional maximum width and height.
print(measure('lorem ipsum dolor')) # all on one line
>>> Size(193.848, 28.8)
print(measure('lorem ipsum dolor', 100, 999)) # word-wrapped at 100px
>>> Size(72.048, 86.4)
You can unpack the returned Size object into a pair of floating point values using destructuring assignment, or take advantage of the textwidth() and textheight() utility functions to access just a single dimension of the measurement. For instance, the following are equivalent:
w, h = measure('foo bar baz')
w = textwidth('foo bar baz')
h = textheight('foo bar baz')
Note that the various metrics commands will perform a full typesetting run with the provided string using the current font() and layout() setting but will not add it to the canvas. Since typesetting is a fairly expensive operation, you’ll see performance improvements if you cache these results rather than repeatedly measuring the same strings in your scripts.
external sources
When typesetting long runs of text, you may find it more convenient to load your strings from external files rather than defining them within your script. You can do this manually by using the read() command to load a file then passing its resturn value to text(). As a bit of syntactic sugar around this pattern, you can also pass a file-path or URL to the text() command directly through its src keyword argument. For example, both the following are equivalent:
content = read('https://plotdevice.io/data/lorem.txt')
text(40,40, str=content)
text(40,40, src='https://plotdevice.io/data/lorem.txt')
In addition to loading plain text files, the src parameter also provides special handling for RTF, HTML, and XML files (primarily differentiated by their file extension). XML files will be interpreted in the manner described by the Inline Styles section above.
HTML and RTF files will preserve their formatting regardless of the current font() and layout() state (though they will honor any width and height parameters present in the text() call). Note that external stylesheets will not be fetched when loading an HTML file, but inline <style> tags can still be used.
Breaking Text Down
The layout performed by the text() command may be automatic, but it’s far from a black-box. The Text object it returns can be queried for a wide variety of layout- and character-level information about the string being typeset.
layout geometry
When you create a Text object with a fixed width and height, its actual size on the canvas is determined by how much of the string fits within that area. You can access both the maximal size and the portion that was required for typestting through the Text object’s frame and bounds properties respectively.
Both of these properties return a Region object specifying the origin and size of the rectangle being measured. You can access a Region’s x, y, w, and h properties to perform additional layout calculations or pass it to one of the primitive drawing commands directly:
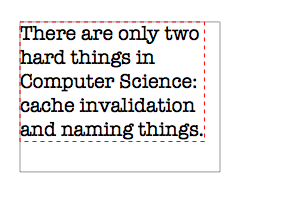
karlton = "There are only two hard things in Computer Science: cache invalidation and naming things."

font('american typewriter', 20)
t = text(20, 40, 200, 150, str=karlton)

nofill()
rect(t.frame, stroke=.6)
rect(t.bounds, stroke='red', dash=4)
In addition to block-level metrics, the Text object also allows you to access the dimensions of individual lines. The lines property is a list of TextFragment objects which provide the same pair of frame and bounds regions as seen above.
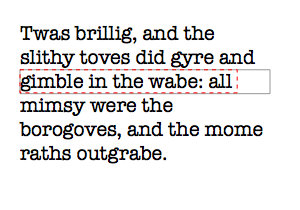
jabber = "Twas brillig, and the slithy toves did gyre and gimble in the wabe: all mimsy were the borogoves, and the mome raths outgrabe."

font('american typewriter', 20)
t = text(20,40, 250,160, str=jabber)
print(len(t.lines))
>>> 6

nofill()
slug = t.lines[2] # metrics of line 3
rect(slug.frame, stroke=0.7)
rect(slug.bounds, stroke='red', dash=4)
finding substrings
In addition to inspecting the Text in terms of its block- or line-level layout, you can also access sub-regions of it based on its content. Using index notation, you can retrieve a TextFragment object describing a single glyph or a ‘slice’ of them.
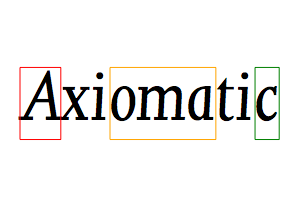
font('Joanna MT', 80, italic=True)
t = text(20,120, str='Axiomatic')

first = t[0]
middle = t[3:6]
last = t[-1]

nofill()
rect(first.bounds, stroke='red')
rect(middle.bounds, stroke='orange')
rect(last.bounds, stroke='green')
You can iterate over the characters in a Text object using a for loop. With each pass through the loop, a new single-character TextFragment is returned. Note that the fragment’s geometry (drawn below in grey) reflects the font’s line-height rather than the shape of the individual letterform. The bounds of the glyph itself can be found by examining the TextFragment’s Bezier representation using the path attribute (drawn below in red):
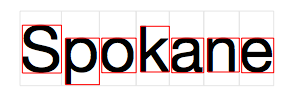
font('Helvetica Neue', 64)
t = text(20, 72, str="Spokane")

nofill()
for glyph in t:
    rect(glyph.bounds, stroke=.9)

for glyph in t:
    rect(glyph.path.bounds, stroke='red')
Text objects also have a basic understanding of sentence structure. The words and paragraphs properties return lists of TextFragment objects separated by whitespace (or punctuation) and line-breaks respectively:
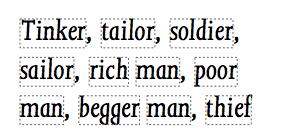
rhyme = "Tinker, tailor, soldier, sailor, rich man, poor man, begger man, thief"

font('Joanna MT', 32, italic=True)
t = text(20,40, 270,160, str=rhyme)

nofill()
for word in t.words:
    rect(word.bounds, stroke=.4, dash=2)
You can search within a Text object using regular expressions (or simple strings). The find() method returns a TextFragment for every matching substring within the Text:
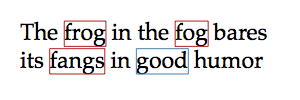
font('Palatino', 23)
t = text(20, 40, 250, str="The frog in the fog bares its fangs in good humor")

for match in t.find('good'): # simple
    rect(match.bounds, stroke='steelblue', fill=None)

for match in t.find(r'f\w+'): # regex
    rect(match.bounds, stroke='firebrick', fill=None)
We’ve already seen how tags within an XML-formatted Text object can be used with the stylesheet() command to specifiy typographic details. Additionally, tags can be used to locate particular regions of the text after it has been typeset. Calling the Text object’s select() method with a tag name will return a TextFragment for each element with that name – even when no style has been assigned to it:
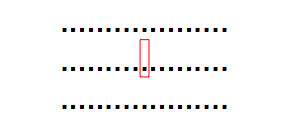
haystack = """...................
.........<needle>.</needle>.........
..................."""

font('Helvetica Neue', 32)
t = text(60,32, xml=haystack)
for match in t.select('needle'):
    rect(match.bounds, stroke='red', fill=None)
Tags in an XML string can also be defined with associated ‘attributes’ of the form:
<tag name="value">…</tag>
These attributes can be accessed by select()-ing the tag by name and accessing the resulting TextFragment’s attrs property. For example, by adding a note attribute to the fn tag, footnotes can appear alongside their referents in the main text:
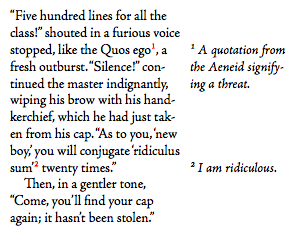
flaubert = """“Five hundred lines for all the class!” shouted in a furious voice stopped, like the Quos ego<fn note="A quotation from the Aeneid signifying a threat.">1</fn>, a fresh outburst. “Silence!” continued the master indignantly, wiping his brow with his handkerchief, which he had just taken from his cap. “As to you, ‘new boy,’ you will conjugate ‘ridiculus sum’<fn note="I am ridiculous.">2</fn> twenty times.”
Then, in a gentler tone, “Come, you’ll find your cap again; it hasn’t been stolen.”"""

font('Adobe Jenson', 14)
layout(hyphenate=True, indent=True)
stylesheet('fn', vpos=1, fill='red')

body = text(10,20, 170, xml=flaubert)
for fn in body.select('fn'):
    note = text('', 190, fn.baseline.y, width=100, italic=True)
    note.append(fn.text, vpos=1)
    note.append(' '+fn.attrs['note'])
Advanced Layout
Sometimes you want to do more than draw a single line or column of text. Luckily, PlotDevice provides extensive control over line-layout within a text block, the ability to ‘flow’ text between columns, and even the ability to generate multi-page booklets. In this section we’ll look at some of the Text object’s more sophisticated options.
Whitespace and Indentation
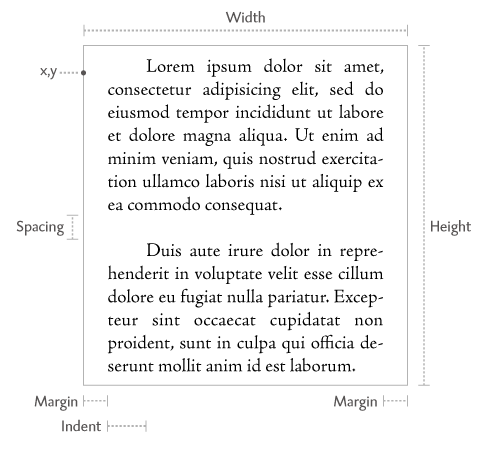
Beyond setting the location and dimensions of a Text object’s frame, you can control a number of typographic paramters at the line- and paragraph-level by using the layout() command (or by defining indent, spacing, or margin values within a stylesheet):
During typesetting, PlotDevice will try to fill the full horizontal width of a Text object’s frame before breaking to a new line. If you’d like to add some additional ‘gutter’ space on the right or left edge of the defined width, you can do so using the layout() command’s margin argument. The margin can be defined using a single value (in canvas units) to specify the left gutter, or a tuple of two values defining the left and right gutters respectively:
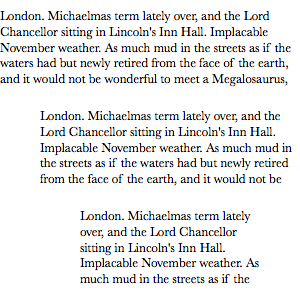
dickens = "London. Michaelmas term lately over, and the Lord Chancellor sitting in Lincoln's Inn Hall. Implacable November weather. As much mud in the streets as if the waters had but newly retired from the face of the earth, and it would not be wonderful to meet a Megalosaurus, forty feet long or so, waddling like an elephantine lizard up Holborn Hill. Smoke lowering down from chimney-pots, making a soft black drizzle, with flakes of soot in it as big as full-grown snowflakes—gone into mourning, one might imagine, for the death of the sun. Dogs, undistinguishable in mire. Horses, scarcely better; splashed to their very blinkers. Foot passengers, jostling one another's umbrellas in a general infection of ill temper, and losing their foot-hold at street-corners, where tens of thousands of other foot passengers have been slipping and sliding since the day broke (if this day ever broke), adding new deposits to the crust upon crust of mud, sticking at those points tenaciously to the pavement, and accumulating at compound interest."

font('Baskerville', 13)
x, y = 0, 20
w, h = 300, 90

layout(margin=0) # the default
text(x,y, w,h, str=dickens)
y += 100

layout(margin=40) # left-side margin
text(x,y, w,h, str=dickens)
y+=100

layout(margin=(80,40)) # both-sides margin
text(x,y, w,h, str=dickens)
When preparing long passages for typesetting, you should be sure to use only a single carriage-return to separate paragraphs. You can then control the inter-paragraph spacing using the layout() command’s spacing argument. It accepts numeric values expressed in terms of the current font’s line-height (with a default of 0).
The spacing parameter can be either a single numeric value (specifying the extra space to add before the paragraph), or a tuple of two values (defining the extra before- and after-space respectively).
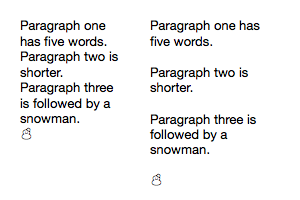
txt = """Paragraph one has five words.
Paragraph two is shorter.
Paragraph three is followed by a snowman.
☃ """
font(13)

layout(spacing=0) # the default
text(20,30, 100, str=txt)

layout(spacing=1) # add 1 lineheight of extra space
text(150,30, 120, str=txt)
The layout() command’s optional indent argument allows you to specify the amount of extra space that will be added to the opening line of a paragraph. It accepts numeric values expressed in terms of the current font’s em size (with a default of 0).
PlotDevice’s indentation logic follows guidelines from book typography. In particular:
- The first paragraph in a Text is never indented
- Paragraphs preceded by a single carriage-return are indented
- Paragraphs preceded by a blank line are not indented
For example, consider this case where we set the indentation size to 1.4 em’s and render a multi-line string:
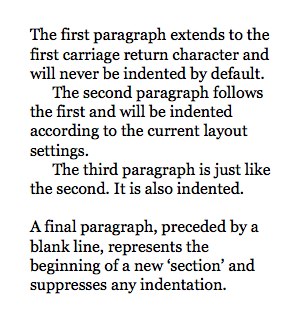
txt="""The first paragraph extends to the first carriage return character and will never be indented by default.
The second paragraph follows the first and will be indented according to the current layout settings.
The third paragraph is just like the second. It is also indented.

A final paragraph, preceded by a blank line, represents the beginning of a new ‘section’ and suppresses any indentation.
"""

layout(indent=1.4)
font('Georgia', 16)
text(30,40, width=250, str=txt)
The indentation defaults can be overridden on a paragraph-by-paragraph basis through the use of ‘escape codes’. When calling text() with a str argument, lines beginning with "\t" will be indented and those beginning with "\b" will have their indentation suppressed. For xml arguments, you should use the entities "&indent;" and "&flush;" instead.
A less-common (but still useful) case is the use of negative indentation values. These can come in handy when typesetting definition-style lists, poetry, and the like. With negative indentation, the previous logic is disregarded and every paragraph is ‘outdented’ identically regardless of its context:
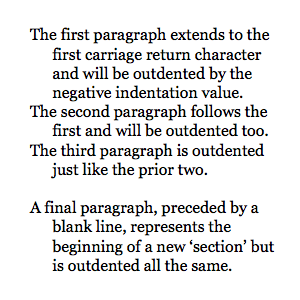
txt="""The first paragraph extends to the first carriage return character and will be outdented by the negative indentation value.
The second paragraph follows the first and will be outdented too.
The third paragraph is outdented just like the prior two.

A final paragraph, preceded by a blank line, represents the beginning of a new ‘section’ but is outdented all the same.
"""

layout(indent=-1.4)
font('Georgia', 16)
text(30,40, width=250, str=txt)
Multi-column Text
When you provide both a width and a height argument to the text() command, PlotDevice will draw only the portions of the string that fit within the rectangle they define. If your string is long enough, it’s quite possible for a portion of it to ‘overflow’ these maximum dimensions and not be visible on the canvas.
To continue drawing the characters that didn’t fit in the initial block of text, you must provide a new rectangle for the rest of the string to ‘flow’ into. Depending on the length of your string and the size of the text-blocks you’re filling, there’s no telling how many of these ‘columns’ you’ll need to create altogether.
By looping over the Text object’s flow() method, you can define a layout for multiple columns of text iteratively. This saves you from having to pre-calculate the total text size and allows you to express the layout of each column relative to the previous one.
When calling flow() you can provide an optional argument for the maximum number of columns you wish to lay out. It will return a series of TextBlock objects with x, y, width, and height properties that are equal to those of the previous TextBlock in the sequence. Within the loop you can simply increment or decrement these positional values to create regularly spaced columns:

kafka = 'Someone must have been telling lies about Josef K., he knew he had done nothing wrong but, one morning, he was arrested. Every day at eight in the morning he was brought his breakfast by Mrs. Grubach’s cook. Mrs. Gru-bach was his landlady but today she didn’t come. That had never happened before. K. waited a little while, looked from his pillow at the old woman who lived opposite and who was watching him with an inquisitiveness quite unusual for her, and finally, both hungry and disconcerted, rang the bell. There was immediately a knock at the door and a man entered.'

font('Adobe Garamond', size=10)
layout(align=JUSTIFY, hyphenate=True)
t = text(20,20, 120,120, str=kafka)
for block in t.flow(2):
    block.x += block.width + 20
The TextBlocks defined during a flow() loop have an additional attribute called idx which marks their sequence in the flow (starting from zero). You can use this value within the loop to influence your layout logic. As your layouts get more complex, you may also find it helpful to place the logic within a function rather than defining it within the for loop – this keeps your code cleaner and also allows you to re-use the same layout scheme on multiple Text objects.
To have a function you’ve defined control the layout, pass it to the flow() method as an argument along with the maximum number of columns you wish to produce. If you’d prefer for the flow process to continue until all the text has been laid out, use the all keyword rather than an integer for the max count:
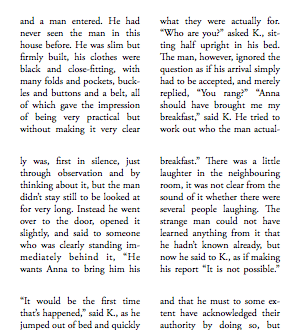
kafka = 'and a man entered. He had never seen the man in this house before. He was slim but firmly built, his clothes were black and close-fitting, with many folds and pockets, buckles and buttons and a belt, all of which gave the impression of being very practical but without making it very clear what they were actually for. “Who are you?” asked K., sitting half upright in his bed. The man, however, ignored the question as if his arrival simply had to be accepted, and merely replied, “You rang?” “Anna should have brought me my breakfast,” said K. He tried to work out who the man actually was, first in silence, just through observation and by thinking about it, but the man didn’t stay still to be looked at for very long. Instead he went over to the door, opened it slightly, and said to someone who was clearly standing immediately behind it, “He wants Anna to bring him his breakfast.” There was a little laughter in the neighbouring room, it was not clear from the sound of it whether there were several people laughing. The strange man could not have learned anything from it that he hadn’t known already, but now he said to K., as if making his report “It is not possible.” “It would be the first time that’s happened,” said K., as he jumped out of bed and quickly pulled on his trousers. “I want to see who that is in the next room, and why it is that Mrs. Grubach has let me be disturbed in this way.” It immediately occurred to him that he needn’t have said this out loud, and that he must to some extent have acknowledged their authority by doing so, but that ...'

font('Adobe Garamond', size=10)
layout(align=JUSTIFY, hyphenate=True)

def leftright(block):
    if block.idx % 2:
        block.x += block.width + 20
    else:
        block.x = 0
        block.y += block.height + 20

t = text(20,24, 120,120, str=kafka)
t.flow(all, leftright)
The TextBlocks that you add during a flow() become ‘children’ of the original Text object and can be accessed through its blocks property as a list. The parent Text and all of its child ‘blocks’ will be laid out as a group, sharing the same root position, style, and transformation state. To get a sense of how the parent object encapsulates its children, notice how the bounds or the Text (drawn in grey) contains all the bounds boxes of the TextBlocks within it:
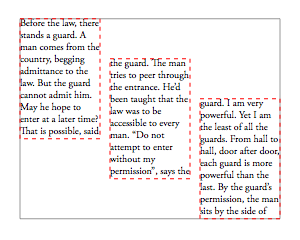
welles = 'Before the law, there stands a guard. A man comes from the country, begging admittance to the law. But the guard cannot admit him. May he hope to enter at a later time? That is possible, said the guard. The man tries to peer through the entrance. He’d been taught that the law was to be accessible to every man. “Do not attempt to enter without my permission”, says the guard. I am very powerful. Yet I am the least of all the guards. From hall to hall, door after door, each guard is more powerful than the last. By the guard’s permission, the man sits by the side of the door, and there he waits. For years, he waits. Everything he has, he gives away in the hope of bribing the guard, who never fails to say to him “I take what you give me only so that you will not feel that you left something undone.” Keeping his watch during the long years, the man has come to know even the fleas on the guard’s fur collar. Growing childish in old age, he begs the fleas to persuade the guard to change his mind and allow him to enter. His sight has dimmed, but in the darkness he perceives a radiance streaming immortally from the door of the law. And now, before he dies, all he’s experienced condenses into one question, a question he’s never asked. He beckons the guard. Says the guard, “You are insatiable! What is it now?” Says the man, “Every man strives to attain the law. How is it then that in all these years, no one else has ever come here, seeking admittance?” His hearing has failed, so the guard yells into his ear. “Nobody else but you could ever have obtained admittance. No one else could enter this door! This door was intended only for you! And now, I’m going to close it.” This tale is told during the story called “The Trial”. It’s been said that the logic of this story is the logic of a dream... a nightmare.'

font('Adobe Garamond', size=10)
t = text(20,26, 80,120, str=welles)
for block in t.flow(3):
    block.x += block.width + 10
    block.y += 40

nofill()
rect(t.bounds, stroke=.6)
for block in t.blocks:
    rect(block.bounds, stroke='red', dash=4)
Ordinarily, the flow() method will only create a new TextBlock when it has completely filled the prior block. However you can force a ‘page break’ of sorts by including a form-feed character "\f" in your string (or a "&break;" entity when using XML). Here, we’re reusing the grid-layout from above but skipping from field to field rather than waiting for an entire frame to overflow before creating a new block:
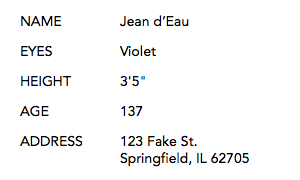
fake_id = """NAME\fJean d’Eau\fEYES\fViolet\fHEIGHT\f3'5"\fAGE\f137\fADDRESS\f123 Fake St.\nSpringfield, IL 62705"""

font('Avenir', size=14)
t = text(20,26, str=fake_id)
for block in t.flow():
    if block.idx % 2:
        block.x += 100
    else:
        block.x = 0
        block.y += 30
Pagination
The Text object’s flow() method is great for laying out columns of text parallel to one another, but what if you want to deal with these blocks sequentially? For this you can use the paginate() command. It accepts an identical set of arguments to the text() command, but rather than returning a single Text object, it returns a generator from which you can pluck Text after Text until your string has been fully laid out.
Unlike the text() command, calling paginate() does not draw anything to the canvas. Instead, it allows you to iterate over its return value and manually plot() each Text object individually at the time of your choosing. For example, here we’re not plotting the text at all, merely logging the details of each ‘page’ to the console:
size(8.5, 11, inch)
for page in paginate(1,1, 6.5,9, src='https://plotdevice.io/data/poe.txt'):
    print(page)
>>> Text(chars=733 overflow=12335 idx=0 folio=1)
>>> Text(chars=808 overflow=11527 idx=1 folio=2)
>>> Text(chars=716 overflow=10811 idx=2 folio=3)
>>> Text(chars=410 overflow=10401 idx=3 folio=4)
>>> Text(chars=471 overflow=9930 idx=4 folio=5)
>>> ...
>>> Text(chars=588 overflow=608 idx=18 folio=19)
>>> Text(chars=608 idx=19 folio=20)
Note that the objects returned by the generator have a pair of extra properties not typically present on Text objects:
- idx – the page’s sequence number (counting up from zero)
- folio - the logical ‘page number’ (counting up from 1 or an alternate starting value specified through paginate’s
foliokeyword argument)
With these tools in hand we have just about everything necessary to do some decent book typesetting. In this example we’re using the multi-page PDF capabilities of the export() command in tandem with the paginate() command to generate a quick-and-dirty ebook:
with export('~/poe.pdf') as book:
    # pick a nice trade paperback-y size so we can use WIDTH & HEIGHT for layout
    size(6, 9, inch)

    # map styles to tag-names in our marked-up XML file
    url = 'https://plotdevice.io/data/poe.xml'
    stylesheet('title', align=CENTER)
    stylesheet('author', indent=0, align=CENTER, italic=True)
    stylesheet('em', italic=True)

    # set up the typesetting basics
    font('Hoefler Text', 12, osf=1)
    layout(leading=1.4, indent=1.4, hyphenate=True)

    # load the XML and draw each page-worth of text to the PDF
    for pg in paginate(.75, .75, WIDTH-1.5, HEIGHT-1.5, src=url):
        with book.page:
            plot(pg) # draw the page
            with layout(align=CENTER):
                text(WIDTH/2, HEIGHT-.5, str=pg.folio) # draw the folio
There is one big caveat to keep in mind when exporting text-heavy compositions to multiple pages. Quartz’s font subsetting routines optimize for the single-page case so your resulting PDF is likely to have a ton of redundant font data baked into every page. To get the file size down to something reasonable, we recommend running the generated PDF through Acrobat’s menu item before distributing it.