Commands
reset()
Syntax
reset()
Description
Resets the current transform to its default state (the identity matrix).
Transformations in PlotDevice build up an incremental state. For example, once rotate(90) is called, all subsequent shapes, paths, text, and images are rotated 90 degrees (i.e., the rotation ‘state’ is 90°). If called again – e.g., rotate(30) – the rotation state becomes 120 degrees (90+30).
Once reset() is called, the rotation state becomes 0 degrees (the default rotation) again. Since reset() affects the entire transform state, it will also wipe out any previously applied translations, skews, and scale-factors.
Context Manager
As with the other transform commands, reset() can be used in a with statement to limit its scope to drawing commands within the following block of code.
Tutorial
Example

font(14), fill(0.2)

rotate(90)
text("one", 30, 80)
text("two", 45, 80)

reset()
text("three", 70, 80)
rotate()
Syntax
rotate(amount) # amount to rotate (in default unit)
rotate(percent=0.5) # 0 ... 1.0
rotate(degrees=180) # 0 ... 360
rotate(radians=pi)  # 0 ... 2*pi (a.k.a. tau)
Description
Rotates all subsequent drawing commands. The rotate() command accepts one parameter to specify the angle (in degrees by default). The angle-unit can be changed by calling geometry() with DEGREES, RADIANS, or PERCENT. Subsequent calls to rotate() will then be interpreted in the chosen units.
Alternatively, a rotation can specify its units explicitly by using a keyword argument. For example, you can use radians to flip the canvas upside down (regardless of the current geometry-unit) wtih:
rotate(radians=tau/2)
Like other transform operations, the rotate() command works incrementally: if you call rotate(30), and later on call rotate(60), all commands following that second rotate() will be rotated 90° (30+60).
Context Manager
As with the other transform commands, rotate() can be used in a with statement to limit its scope to drawing commands within the indented block of code.
Tutorial
Example

fill(0.2)
rotate(-45)
rect(30, 30, 40, 40)
scale()
Syntax
scale(x, y=None)
Description
Increases, decreases, or streches the size of all subsequent drawing commands. The first parameter sets the horizontal scale and the optional second parameter the vertical scale. You can also call scale() with a single parameter that sets both the horizontal and vertical scale. Scale values are specified as floating-point (decimal) numbers with 1.0 corresponding to 100%.
The scale() command works incrementally: if you call scale(0.5), and later on call scale(0.2), all subsequent drawing commands will be sized to 10% (0.2 of 0.5).
Context Manager
As with the other transform commands, scale() can be used in a with statement to limit its scope to drawing commands within the following block of code.
Tutorial
Example

fill(0.2)
poly(30,30, 20)
scale(0.5)
poly(70,30, 20)
skew()
Syntax
skew(x, y=None)
Description
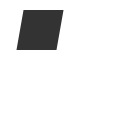
Slants the direction of all subsequent drawing commands. The first parameter sets the horizontal skew. The second parameter is optional and sets the vertical skew.
Skew values are expressed as angles using the current geometry() unit (DEGREES by default). The skew() command works incrementally: if you call skew(10), and later on call skew(20), all subsequent drawing commands will be skewed by 30° (10+20).
Context Manager
As with the other transform commands, skew() can be used in a with statement to limit its scope to drawing commands within the indented block of code.
Tutorial
Example
fill(0.2)
skew(10.0)
rect(20, 10, 40, 40)
transform()
Syntax
transform(mode)
Set the current transform mode (to CENTER or CORNER)
transform(matrix=[m11, m21, m12, m22, tX, tY])
Overwrite the current transform matrix with a new one
with transform(mode=None, matrix=None):
    ... # drawing & transformation commands
Restore the transformation state at the end of the indented block (and optionally change the transform mode/matrix for the duration)
Description
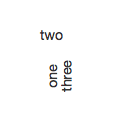
The mode parameter sets the registration point – the offset for rotate(), scale() and skew() commands. By default, primitives, text, and images rotate around their own centerpoints. But if you call transform() with CORNER as its mode parameter, transformations will be applied relative to canvas’s ‘origin point’ rather than being relative to the objects’ centerpoint origins.
In addition to changing the mode, the transform() command also allows you to overwrite the underlying transformation matrix with a new set of values. Pass a 6-element list or tuple as the matrix argument to update the current transform (see Apple’s docs for all the math-y details). Note that you can omit the mode arg when setting a new matrix if you don’t want the transformation origin to change.
Context Manager
When called as part of a with block, transform() will ensure that any subsequent transformation commands will apply only within the block. At the end of the block, the transformation state will be reset to what it was before the transform() call. This is equivalent to calling push() and pop() at the beginning and end of the block respectively, though transform() will also reset the mode on exit.
with transform(CORNER):
    translate(100,20)
    line(0,0, 40,0)
is equivalent to:
oldmode = CENTER
transform(CORNER)
push()
translate(100,20)
line(0,0, 40,0)
pop()
transform(oldmode)
Returns
a Transform object with the canvas’s ‘current’ state. You can use this object’s apply() method with Points or Beziers to calculate the ‘screen coordinates’ that would result from drawing with the current transformation state.
Tutorial
Examples
fill(0.2)
fontsize(14)
rotate(90)
text("one", 40, 80)

with transform():
    rotate(-90)
    text("two", 40, 40)

text("three", 50, 80)
translate()
Syntax
translate(x, y)
Description
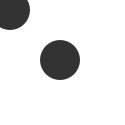
Shifts the origin used when interpreting drawing commands’ coordinates. The first parameter sets the horizontal offset, the second parameter the vertical offset. Translating is the same as dragging something across the screen. Or the same as moving the canvas registration point, which is situated in the upper left corner by default.
After calling translate(), all subsequent drawing commands are shifted by the specified offsets. This can be useful when positioning groups of multiple elements.
Context Manager
As with the other transform commands, translate() can be used in a with statement to limit its scope to drawing commands within the following block of code.
Tutorial
Example
fill(0.2)
arc(10,10, 20)
translate(50, 50)
arc(10,10, 20)
Objects
Point
Syntax
Point(x, y)
Description
A pair of x & y coordinates wrapped into a single value. You can access its properties by name in addition to using the object as a ‘normal’ tuple. Point objects support basic arithmetic and provide utility methods for geometry calculations.
PlotDevice commands that take separate x & y arguments (e.g., poly(), arc(), text()) will typically also accept a Point object in their place.
Properties
pt.x
pt.y
Methods
pt.angle(point)
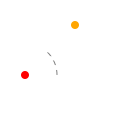
Returns the angle from the object to a target Point or pair of (x,y) coordinates. By default, the angle will be represented in degrees, but this can be altered by setting an alternate unit with the geometry() command.
src = Point(25,75)
dst = Point(75,25)
theta = src.angle(dst)
arc(src, 4, fill='red')
arc(dst, 4, fill='orange')
with pen(dash=5), stroke(.5), nofill():
    arc(src, 32, range=theta)
print(theta)
>>> -45.0
pt.distance(point)
Returns the linear distance between the object and a second Point or pair of (x,y) coordinates.
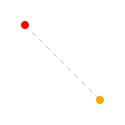
src = Point(25,25)
dst = Point(100,100)
length = src.distance(dst)
arc(src, 4, fill='red')
arc(dst, 4, fill='orange')
with pen(dash=5), stroke(.8):
    line(src, dst)
print(length)
>>> 106.066017178
pt.reflect(point, d=1.0, a=180)
Uses the object as an ‘origin’ and returns a Point containing the reflection of a target Point or pair of (x,y) coordinates. The optional d parameter is a magnification factor relative to the distance between the mirror and the target point.
The a parameter controls the angle of reflection. When set to 180° (the default), the reflected point will be directly opposite the target, but other values will allow you to ‘ricochet’ the target point off of the mirror instead.
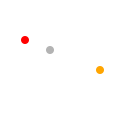
origin = Point(50,50)
src = Point(25,40)
dst = origin.reflect(src, d=2.0)
arc(src, 4, fill='red')
arc(dst, 4, fill='orange')
arc(origin, 4, fill=.7)
pt.coordinates(distance, angle)
Uses the object as the ‘origin’ of a polar coordinate system and returns a Point at a given distance and orientation relative to the origin. The distance parameter uses the current canvas size() unit and the angle should be expressed in the current geometry() unit.
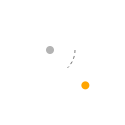
origin = Point(50,50)
dst = origin.coordinates(50, 45)
arc(origin, 4, fill=.7)
arc(dst, 4, fill='orange')
with pen(dash=3), stroke(.5), nofill():
    arc(origin, 25, range=45)
If you’d prefer to work with raw numbers rather than Point objects, you can also import the numerical versions of these methods for use in your scripts:
from plotdevice.lib.pathmatics import angle, distance, coordinates, reflect
Tutorial
Region
Syntax
Region(x, y, w, h)
Region(Point, Size)
Description
An origin Point and a Size which together describe a rectangular region. Region objects have properties to read and modify the rectangle geometry. Methods allow you to generate new regions from combinations of old ones or by systematically shifting their values.
PlotDevice commands that take x/y/w/h arguments (e.g., rect(), oval(), image()) will also accept a Region object in their place.
Geometry Properties
r.x, r.y # position
r.w, r.h # dimensions
r.origin # Point(r.x, r.y)
r.size   # Size(r.w, r.h)
Convenience Properties
r.top, r.bottom, r.left, r.right # edge positions
r.w/h/t/b/l/r # shorthand aliases
Methods
r.intersect(region)
return a new Region describing the overlapping portions of the existing Region object and a second Region
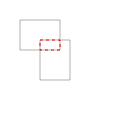
r1 = Region(20,20, 40,30)
r2 = Region(40,40, 30,40)
overlap = r1.intersect(r2)
with nofill(), stroke(.7):
    rect(r1)
    rect(r2)
    rect(overlap, stroke='red', dash=3)
r.union(region)
return a new Region that contains the combined bounds of the existing Region object and a second Region
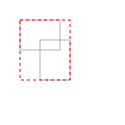
r1 = Region(20,20, 40,30)
r2 = Region(40,40, 30,40)
union = r1.union(r2)
with nofill(), stroke(.7):
    rect(r1)
    rect(r2)
    rect(union, stroke='red', dash=3)
r.shift(point)
return a copy of the Region with its origin shifted by a Point
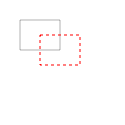
r = Region(20,20, 40,30)
shifted = r.shift(20,15)
nofill()
rect(r, stroke=.7)
rect(shifted, stroke='red', dash=3)
r.inset(dx, dy)
return a copy of the Region whose horizontal dimensions have been shrunk by dx and vertical by dy. If dy is omitted, shrink both dimensions by dx. Passing a negative value for dx or dy will enlarge the dimension rather than shrinking it.
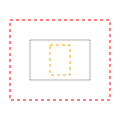
r = Region(30,40, 60,40)
shrunk = r.inset(20,5)
grown = r.inset(-20)
nofill()
rect(r, stroke=.7)
rect(shrunk, stroke='orange', dash=3)
rect(grown, stroke='red', dash=3)
Tutorial
Size
Syntax
Size(width, height)
Description
A pair of width & height values wrapped into a single object. Size objects are very similar to Points and arithmetic between the two types is supported.
Properties
s.width
s.height
s.w, s.h # shorthand aliases
Tutorial
Transform
Syntax
Transform()
Description
A local transformation state (independent of the global, canvas transform). You can use Transform objects to apply translation, rotation, scaling and skewing to a path before drawing it.
Methods
t.translate(x=0, y=0)
t.rotate(degrees=0, radians=0)
t.scale(x=1, y=None)
t.skew(x=0, y=0)
t.invert()
t.append(t)
t.prepend(t)
t.apply(path_or_point)
t.copy()
See the tutorial on paths to learn more about the methods.
The apply() method returns a new Bezier or Point with the defined transformations applied to it.
Legacy Commands
push() & pop()
Syntax
push()
pop()
Description
PlotDevice is a so-called state-machine in which certain types of modifications are cumulative. For example, once rotate(45) is called, all subsequent shapes, paths, text and images are rotated 45 degrees – the rotation ‘state’ has been set to 45°.
All transformations, such as rotate() and skew(), defined between a push() and pop() call last only until pop() is called. Thereafter the previous state is used. For example, a rotate(-30) within a rotate(45) means a rotation state of 15° until pop() is called and the rotation state becomes 45 degrees again.
PlotDevice Equivalent
While push() & pop() allow your script to save and restore the state manually (and leave it up to you to ensure that a call to one is balanced by a call to the other). The transform() command provides a context manager to limit the scope of these state changes to an indented block of code.
Tutorial
Example

fill(0.2)
fontsize(14)
rotate(90)
text("one", 40, 80)

push()
rotate(-90)
text("two", 40, 40)
pop()

text("three", 50, 80)