The PlotDevice canvas ‘remembers’ the style and transformation settings used to draw primitives. These settings make up the ‘graphics state’ and exist independently from the primitives you add to the canvas. This lets you keep drawing- and styling-related code separate and allows you to apply styles to groups of objects rather than needing to configure each one.
You can think of it like working on an oil-painting. While at the easel, you can hold one type of brush and put one color of paint on it. All the strokes you paint on the canvas will have the same color and texture according to the thickness of the brush and color of paint. Naturally, you could paint with both hands and feet holding multiple brushes with multiple colors … but we wouldn’t recommend it.
In PlotDevice you ‘paint’ with one color at a time. All of the elements you draw have the same color until you actively switch to a different one. Then all subsequent elements you draw will use that new color.
Stateful Commands
When you run a script, PlotDevice reads the code from top to bottom, like a recipe. When it encounters certain state-changing commands, it responds not through any immediately visible change, but instead by silently updating the canvas’s ‘current’ setting for the given attribute. Afterwards, any primitives you draw will ‘inherit’ the graphics state, including your modification.
Quite a few commands affect the graphics state, but they fall into four general categories:
- Color & line-style: color(), fill(), stroke(), pen()
- Compositing effects: alpha(), blend(), shadow()
- Transformations: transform(), translate(), rotate(), scale(), skew(), reset()
- Typography: font(), layout(), stylesheet()
At the beginning of your script, the state is initialized to a set of reasonable defaults:
- the fill color is
- the stroke color is
- the pen’s nib size is (though lines will only be drawn if the stroke is visible)
- the transform is (to the ‘identity’ matrix)
- the font is at 24pt (with a leading of 1.2)
You can also restore the graphics state to these defaults at any time by calling the clear() command with the parameter all.
Setting the State
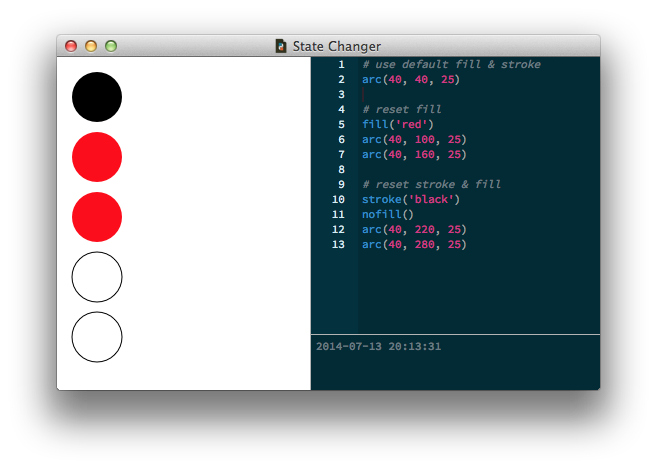
All the primitives we draw to the canvas will use the default style settings (until we overwrite them with new values). For example, observe the following script. We start by drawing a circular arc with the default color state. We then change the fill to and draw a pair of circles below the first. Finally we change the stroke from transparent to and the fill color to . After making this change, we draw two more circles which inherit the new style:
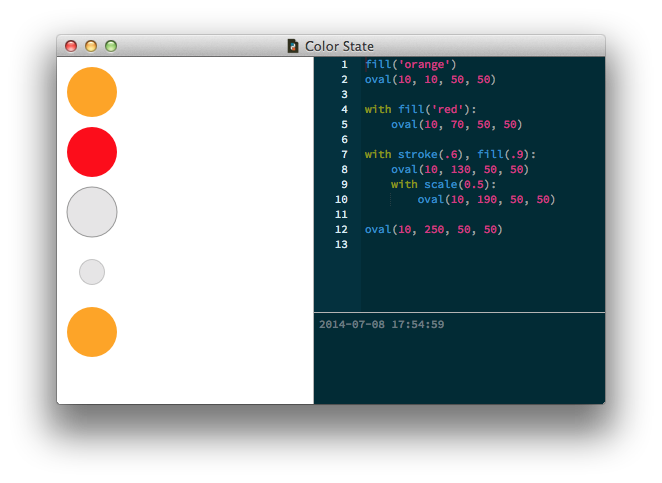
The magical ‘with’ statement
Many PlotDevice commands support an optional ‘clean up’ behavior. In fact nearly everything that affects the graphics state can be made into a temporary modification by calling the command as part of a with statement.
When you call a command in a with statement, place a colon at the end of the line and add one or more indented lines of code below it. When called this way, the state-changing commands will ‘remember’ the previous setting before modifying it. When the indented-block is done executing, the remembered state will be restored for the given command.
For example, both of the following are equivalent:
oldfill = fill() # remember the old color
fill('red')      # set the new color
arc(40,40, 10)   # draw
fill(oldfill)    # restore the old color
with fill('red'):  # remember the old color and set a new one
    arc(40,40, 10) # draw
...                # old color automatically restored
You can even combine multiple commands (separated by commas) and their effects will be limited to the drawing that happens inside the indented code-block that follows. Once you return to the outer indentation-level, it’s as if you never changed the graphics state:
Commands that support the with statement are called ‘context managers’ in Python lingo. Take a look at the Reference section’s table of contents to see which commands can be used in this manner (they’re all marked with dots). Then read their reference entries for details on how the with usage changes their behavior.
Breaking the State
If necessary, you can break away from the ‘current’ state and colorize or transform elements individually. Each of the drawing primitives accepts optional parameters that correspond to the state-changing commands:
- fill and stroke for colors
- nib, join, cap, and dash for line-drawing
- alpha, blend, and shadow for compositing effects
In addition to these parameters, the text() primitive also supports all of the settings available in the font() and layout() commands:
- family, size, italic, tracking, etc. from font() for setting character styles
- leading, indent, margin, align, etc. from layout() for setting paragraph styles
So you could ‘override’ the canvas’s fill color with:
rect(20, 20, 100, 100, fill="red")
Or you could break away from the canvas’s Typography settings with:
text("hello", 200, 200, family="Baskerville", size=24, italic=True, align=CENTER)
Restyling Primitives
When you call a primitive command, it returns a reference to the Bezier, Text, or Image object that has been created. If you assign this value to a variable, you can inspect the style-settings it ‘inherited’ from the global state and modify them for that object alone. This can come in handy in looping contexts where you may not know the settings you wish to modify until after calling the primitive command.
For instance, the previous example of drawing a red box (regardless of the current fill() color) could also be achieved by modifying a reference to the Bezier returned by the rect() command:
r = rect(20, 20, 100, 100)
r.fill = color("red")
Similarly, you can modify the object’s Transform by calling its methods:
r.translate(x, y=None)
r.rotate(angle)
r.scale(x, y=None)
r.skew(x, y=None)
r.reset()
The transformations are then applied only to rectangle r. Since each of the transform methods returns a reference to the primitive, you can even ‘chain’ these calls:
r.reset().translate(100, 50).rotate(45)