Paths in PlotDevice are made up of cubic Bezier curves. Beziers are commonly used in computer graphics to draw smooth contours. A ‘curve’ is defined by a starting point, an ending point, and two control handles that describe the curvature between the endpoints. The first handle describes the forward curvature of the starting point, the second handle the backward curvature of the ending point.
For example:
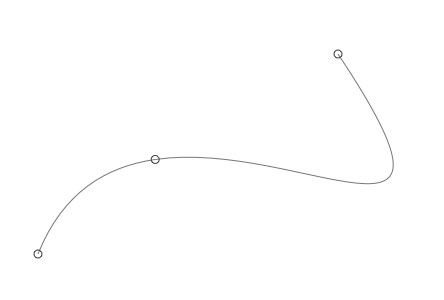
with bezier(100,100, fill=None, stroke=0) as path:
    curveto(150,100, 200,200, 50,400)
Draws the following curve:
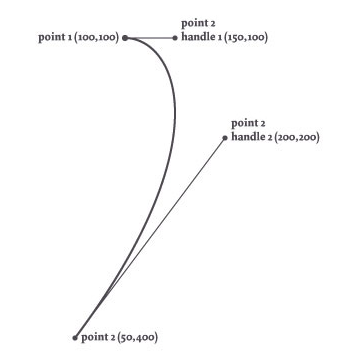
By default, the path would be filled black and drawn without a stroke color. The fill and stroke arguments override these to give us just the line itself.
Note that the initial point (100,100) is set as part of the bezier() call, while the destination point is the final pair of args passed to curveto(). Whenever you call any of the ‘to’ commands – lineto(), arcto(), or curveto() – it implicitly uses the Bezier’s ‘current pen position’ as the starting point for the next line segment.
Manipulating Paths
Bezier objects give you access to all the points in a path as well as their control handles.
This allows you to transform paths on the fly and even manipulate type (using the
textpath() comand). Additionally, you can unite and intersect different paths or perform a variety of math operations (e.g., calculating the x and y coordinates of a point halfway down the path).
Paths are iterable lists of Curves
Each of the PlotDevice shape commands (arc(), poly(), etc.) returns a Bezier object. This object is a list-like sequence of Curve objects that you can iterate over. Using the Curve’s properties, you can retrieve or edit the path’s vertices, control handles, and command-types (straight line, curve, move-pen, or close).
Each element in the path is a Curve object with the following attributes:
curve.x
curve.y
the horizontal and vertical location (as floating point numbers).
curve.cmd
the type of line segment, either LINETO,
CURVETO, MOVETO or CLOSE
If curve.cmd is CURVETO, a pair of
‘control handles’ will also be defined. Each control handle is a simple Point object with x and y attributes:
curve.ctrl1.x
curve.ctrl1.y
the location of the first control handle
curve.ctrl2.x
curve.ctrl2.y
the location of the second control handle
The handles are useful for paths that consist of multiple Bezier curves. The ctrl1 handle controls how the curve connects to the previous point, the ctrl2 handle how the curve connects to the destination point. For example:
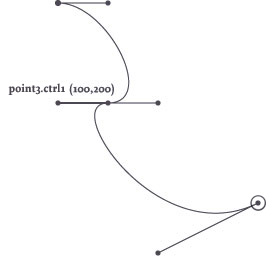
stroke(0) and nofill()
with bezier(100,100) as path:
    curveto(150, 100, 200, 200, 150, 200)
    curveto(100, 200, 200, 350, 300, 300)
Example: Letterform Vandalism
This is the path returned from the textpath() command for the character e in the Dolly typeface. Superimposed are its curves’ control points:
font("Dolly", "bold", 300)
path = textpath("e", 10, 150)
bezier(path, stroke='black', fill=None)
This is the same path, but modified. The location of each curve’s (x,y) point is translated downwards:
font("Dolly", "bold", 300)
path = textpath("e", 10, 150)
curves = []
for curve in path:
    curve.y += 20 # nudge the point downward
    curves.append(curve)

# draw a new bezier (built from our list of Curve objects)
bezier(curves, stroke='black', fill=None)
As you can see, it’s easy to manipulate a path by looping through all of its Curves in a for-loop before actually drawing the path. Note that modifying the Curve objects in the for-loop does not affect the original path. Instead we’re saving the modified Curves and using them to generate a brand new Bezier in the final line.
We don’t have to limit ourselves to messing with the point coordinates either. Here we use a similar loop to modify the path’s control handles, letting each curving point ‘droop’ a bit (let’s hope the guys at Underware don’t freak when they see what happened their beautiful typeface):
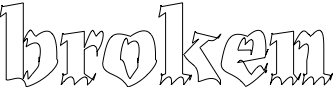
font("Dolly", "bold", 100)
path = textpath("broken", 0,80)

curves = []
for curve in path:
    if curve.cmd == CURVETO:
        curve.ctrl2.x += 5
        curve.ctrl2.y -= 10
        curve.y += 5
    curves.append(curve)

with stroke(0), nofill():
    bezier(curves)
With some slightly more advanced math we could create a handwritten variation of the text, or one in which each character looks a little different every time it’s drawn. The examples in the Path Filters chapter should give you an idea of what’s possible.
Path Mathematics
Each of the Curves that makes up a Bezier path has a starting point, an ending point, and control handles. What if we want to know the location of a point on the path that is not one of these endpoints, but somewhere in between? What is the location of the midpoint of an arc for example? The Bezier object has some interesting methods we can use to answer these questions:
path.points(amount=100)
Returns a list of Point objects, with the length of the list determined by amount.
path.point(t)
Returns a single Point located at a relative distance along the bezier. The t argument should be a value between 0.0 and 1.0 representing the ‘time’ on the path.
path.insert(t)
Inserts a new Point at relative-distance t into the path.
A path also has the following properties:
path.length
The total length of the path (e.g., the circumference when the bezier is circular).
path.contours
A list of separate ‘sub-paths’ in the path (each represented as a distinct Bezier object). Sub-paths occur when one or more CLOSE Curves are found in a path.
These speed-optimized commands are extremely useful when calculating orbits of animated elements moving down an invisible path in an animation, when creating custom type like the LetterKnitter, when growing cilia on shapes, and so on.
A special thanks goes to professor F. De Smedt at the Free University of Brussels for his integration and interpolation routines (see also: de Casteljau’s algorithm).
Finding points on a path
The example below is an illustration of how points on a path can be found with t (a number between 0.0 and 1.0) representing ‘time’ on the path. When t is 0.5, this means halfway down the path. The path’s origin is at 0 and its end is at 1.
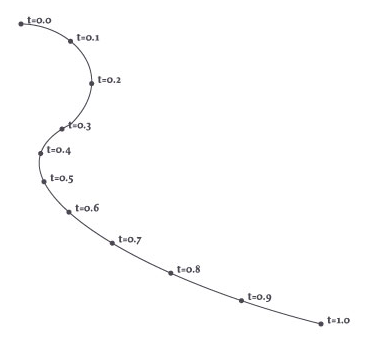
with bezier(100, 100, fill=None, stroke=0) as path:
    curveto(150, 100, 200, 150, 150, 200)
    curveto(50, 250, 200, 350, 400, 400)

for t in range(11):
    pt = path.point(0.1*t)
    oval(pt.x-2, pt.y-2, 4, 4)
And it’s even easier using the path’s points() method:
for pt in path.points(11):
    oval(pt.x-2, pt.y-2, 4, 4)
Inserting points on a path
Injecting new points into the path is equally easy; just specify the t value where you’d like to create a new vertex. Note that this won’t change the shape of the bezier, it just changes the number of elements you’ll encounter when iterating through the path:
nofill()
with bezier(100, 500, stroke=0.5, close=False) as path:
    curveto(200,250, 600,600, 400,300)

path.addpoint(0.25)
stroke(0.2)
for curve in path:
    oval(curve.x-4, curve.y-4, 8, 8)
Compound Paths
So far we’ve talked about paths being sequences of segments: two points and the curve in between. A group of segments that has a beginning and an ending (or is ‘closed’) is called a sub-path or contour. Character glyphs are often a composite of two contours (for example, the inner and outer oval of the character ‘o’). In typography it’s often useful to get the separate contours.

font("Dolly", "bold", 50)
with pen(2), nofill():
    path = textpath("@#$&!", 10, 50)
    for contour in path.contours:
        stroke(HSV, random(), 1, .8)
        bezier(contour)
But contours aren’t limited to type. You can create your own compound paths by calling the shape primitives within a bezier() block. Rather than being drawn independently, drawing operations within the block are added to the bezier.
When the bezier is finally drawn (at the end of the indented block), all the curves will have the same fill and stroke and the path will be rendered in a single operation. You’ll often find it more efficient to group similarly-styled shapes into a bezier rather than drawing each separately.
Note how when the lines are grouped into a single Bezier, their translucent strokes no longer ‘overlap’:
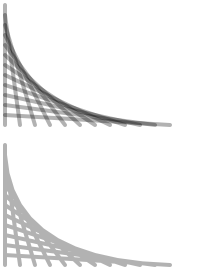
stroke(0, .3) # use a translucent black
pen(4, cap=ROUND)

# draw twelve overlapping lines separately
translate(5,5)
for i in range(12):
    line(0, i*10, i*15, 120)

# draw them as a single compound-path
translate(0, 140)
with bezier():
    for i in range(12):
        line(0, i*10, i*15, 120)
You can group more than simple lines into a path. In fact, you can call any of the shape-drawing primitives as well as the text() command inside a bezier() block and they’ll be added as sub-paths rather than immediately drawn to the canvas:
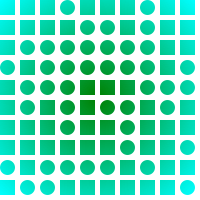
# capture the bezier into the `path` variable
with bezier(plot=False) as path:
    for x,y in grid(10,10, 20,20):
        shape = choice([rect, oval])
        shape(x,y, 15,15)

# apply a gradient fill color to the compound path
fill('green', 'cyan')
bezier(path)
Flattening operations
Paths can be combined using boolean set operations. This means you can create a new compound path from a combination of other paths. This is useful if you want to create a shape from a mixture of other shapes (like ovals and rectangles) and then flatten the group into a single path (with no overlaps). Manipulating a single shape is both faster and easier than manipulating a group of shapes.
Each of the following methods returns a new Bezier created by merging the two given paths. The manner in which the new path is traced differs for each method:
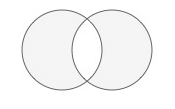
path.union(path2, flatness=0.6)
Traces and merges the two paths, removing any overlapping parts.
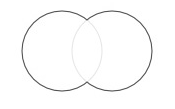
path1 = arc( 50,50, 40, plot=False)
path2 = arc(100,50, 40, plot=False)
compound = path1.union(path2)
with stroke(0), nofill():
    bezier(compound)
path.intersect(path2, flatness=0.6)
Traces the overlapping region and removes everything else.
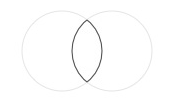
path1 = arc( 50,50, 40, plot=False)
path2 = arc(100,50, 40, plot=False)
compound = path1.intersect(path2)
with stroke(0), nofill():
    bezier(compound)
path.difference(path2, flatness=0.6)
Subtracts the second shape from the first shape.
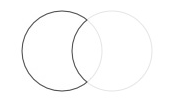
path1 = arc( 50,50, 40, plot=False)
path2 = arc(100,50, 40, plot=False)
compound = path1.difference(path2)
with stroke(0), nofill():
    bezier(compound)
path.xor(path2, flatness=0.6)
Traces non-overlapping regions, excluding any areas that overlap.
path1 = arc( 50,50, 40, plot=False)
path2 = arc(100,50, 40, plot=False)
compound = path1.xor(path2)
with stroke(0), fill(0.8):
    bezier(compound)
The returned path can be manipulated like any other Bezier. You can fill() and stroke() it, rotate() it then draw it (or multiple copies of it) onscreen by passing it to bezier().
One thing to note is that the compound path will not contain any curves. Instead, it is made up of numerous straight line segments (which is why we say the path has been ‘flattened’). Each of the compound methods has an optional flatness parameter. The lower it gets, the more line segments will be drawn (and hence the smoother the resulting shape).
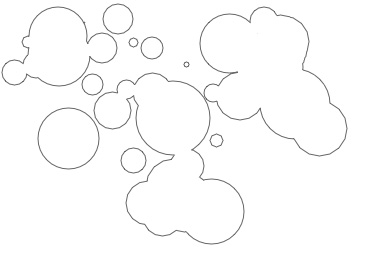
Constructing a flattened path
Using a for-loop we can repeatedly create new sub-paths to build up a compound path. In the example below, we create a number of circles varying in size, then append them to one flattened compound path:
compound = None
for i in range(50):
    r = random(75)
    path = oval(random(300), random(200), r, r, plot=False)
    if not compound:
        compound = path
    compound = compound.union(path)
bezier(compound, fill=None, stroke=0)
Using a Transform object
It’s easy enough to draw transformed and colored copies of the compound path, but what if we want to rotate and scale the individual shapes before flattening them? We can use the Transform object for this purpose.
# We construct our individual shape in the top-left corner.
# This is where corner-mode transforms originate.
# We'll later on place the eventual compound path
# where we want it with translate().
path = rect(-10, 0, 20, 100, plot=False)

# Let's chip away a small piece of the rectangle:
path = path.difference(rect(-15, 80, 20, 15, plot=False))

# Create a rotation transform we'll repeatedly apply to a path
t = Transform()
t.rotate(20)

compound = path
for i in range(17):
    # Before adding the rectangle shape to
    # the flattened compound, we rotate it a bit.
    path = t.apply(path)
    compound = compound.union(path)

translate(275, 275)
nofill()
stroke(0)
bezier(compound)
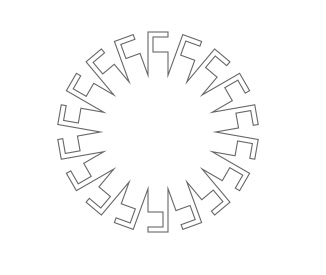
Try adjusting the number of iterations through the for-loop to see where our wheel-like final shape comes from.
Clamping Paths
Paths can be forced to fit a bounding box. Then as the size of the box is adjusted the path will stretch accordingly. This ‘reverse’ logic is useful in situations where a path needs to exactly fit an area and we don’t want to be bothered with creating the shape in exactly the right proportions or at the right position.
path.fit(x=None, y=None, width=None, height=None, stretch=False)
Modifies the path to fit within the specified constraints.
All of the parameters are optional so you can define any combination of them:
- x: the path will be positioned at the specified x value.
- y: the path will be positioned at the specified y value.
- width: the path will be of the specified width.
- height: the path will be of the specified height.
- stretch: if both width and height are defined, either stretch the path or preserve the aspect ratio.