Commands
font()
Syntax
font(family, weight, size, italic=False, **options)
Description
Sets the font, typographic features, and letter-spacing to be used by the text() command (or modifies selected attributes of the current font). The family and weight arguments are strings corresponding to the name of a font family installed on the system and a weight name. If the family lacks the specified weight, the closest match will be used instead. If included, the size argument should be a number representing the desired point size. All three positional arguments are optional since unspecified attributes will use the canvas’s current font() setting as a basis for selecting a new one.
You can retrieve a list of valid family names on your system using the fonts() command. To determine which weights & styles are provided by a given family, either create a Family object and inspect its properties, or take a look at the weights, widths, and variants properties of the current Font object (returned by calling font() with no arguments).
Typeface Parameters
italic
A boolean (or 0/1) value specifying whether to use the italic style of the current font family. Note that the family must provide an italic as it won’t be algorithmically generated. If you’re dead-set on hacking in a fake italic, try drawing the text as an outline and applying a skew transform to it.
width
For families that provide a range of widths (e.g., ‘compressed’, ‘condensed’, or ‘extended’), the width argument allows you to select them by name.
variant
The vast majority of western typefaces use weight, width, and italicization as the ‘axes’ for selecting fonts. Occasionally you will run into a family with a more idioscyncratic organization (for example, see Chalet’s goofy/charming city-and-era naming scheme). Strings passed as the variant arg allow you to select these sorts of non-standard names.
face
A typeface consists of a ‘family’ of individual ‘fonts’ which relate to one another along axes like weight or width. Typically you will select fonts by specifiying a family and a combination of attributes. You can also hard-code your selection by passing a so-called ‘PostScript Name’ for a particular font weight & style and passing that as the face parameter. For instance, the following are equivalent:
font('avenir', 'heavy', italic=True)
font(face='Avenir-HeavyOblique')
To find the face name of a specific font, use the option in the menu of Font Book.
tracking
Controls the letter-spacing of a run of text. The value is a positive or negative number in thousandths of an em and sets the amount of extra space added (or subtracted) between characters. The default value is zero, meaning no extra space will be added beyond what is specified in the font’s kerning tables. To disable kerning altogether, set the value to None.
OpenType-feature Parameters
If the selected font is an OpenType file with support for advanced typographical features, you may pass any of the following optional arguments to enable or disable them. Note that these settings will only affect the typesetting if the font was designed to support OpenType or ‘AAT’ features.
Argument values may be either a boolean or the intergers 0 and 1. Certain features also accept other integer values or the all keyword as noted below.
lig
Enable or disable standard and ‘rare’ ligatures. Defaults to True.
False / 0 | disable standard ligatures |
True / 1 | enable standard ligatures |
all | enable both standard and ‘rare’ ligatures (if any are defined) |
sc
Control how upper and lower case characters are mapped to ‘small capital’ glyphs.
False / 0 | upper- & lower-case characters rendered normally |
True / 1 | lower-case characters will be rendered as small caps |
all | all characters will be rendered as small caps |
-1 | upper-case characters will be rendered as small caps |
osf
Select between ‘lining’ and ‘old style figures’ when drawing numbers.
False / 0 | use lining (or ‘upper case’) numerals |
True / 1 | use old style (or ‘lower case’) numerals |
tab
Set the horizontal spacing used by runs of number characters. Fonts will typically default to proportional spacing, meaning the columns in sequential lines won’t line up. Enabling ‘tabular’ spacing will add extra space around narrow digits so everything lines up nicely.
False / 0 | use proportional spacing for numerals |
True / 1 | use tabular (or ‘monospaced’) numerals |
vpos
Set the vertical position of numbers (and possibly also letter characters). Many fonts allow you to draw ‘superscript’ characters and a smaller number also support ‘subscripts’.
1 | draw superscripts |
0 | draw normal (vertically centered) characters |
-1 | draw subscripts (if supported) |
ord | draw ordinals (if supported) |
frac
Enable or disable ‘automatic fractions’. If the font supports this, strings such as "1/2" or "3/4" will be converted to a single glyph with a diagonal solidus drawn between the numerator and denominator.
False / 0 | Disable automatic fractions |
True / 1 | Enable fractions |
ss
Enable one or more ‘stylistic sets’ provided by the font. Tragically, these sets of alternate character forms don’t have human readable names. Fonts can define up to 20 sets, with each identified by an integer.
None / 0 | Use the font’s default character forms |
1…20 | Enable the n’th set (and disable all others) |
[1,5,…] | Enable multiple stylistic sets |
all | Enable all sets supported by the font |
Context Manager
The font() command (and the Font object it returns) can both be used as part of a with statement. Changes to the current typeface will be applied at the beginning of the code block, then restored to the previous style at the end.
Returns
Tutorial
Example
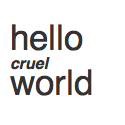
fill(0.2)
font("Helvetica", 35)
text("hello", 10, 50)
with font("bold", 16, italic=True):
    text("cruel", 10, 69)
text("world", 10, 95)
layout()
Syntax
layout(**options)
Description
Sets the layout behavior used by text() for multi-line blocks of type. Parameters set through layout() apply to entire ‘paragraphs’ within the source text (as separated by "\n" characters in the string being drawn). Note that as with the font() command, any of these keyword arguments can be passed to the text() command directly to override the global state. You can also include layout() parameters when defining a stylesheet() tag, but their effect will only be seen when applied to the first character in a given paragraph.
Parameters
align
Text can be aligned to the LEFT, RIGHT, or CENTER or spaced out to fill the entire width of the textblock via the JUSTIFY option. See the legacy align() command for examples of each.
indent
Controls the amount of indentation space for a paragraph. The value is a floating point number that specifies the indentation of the paragraph’s first line in em-units. If the value is negative, the paragraph’s first line will be flush with the margin and all subsequent lines in the paragraph will be indented by that measure.
hyphenate
Controls whether line-breaking operates on the level of words or syllables. If set to True, the layout engine will attempt to break lines even mid-word in order to create a nicer rag. Hyphenation is especially useful when drawing text with an alignment of JUSTIFY since word spacing can get comically loose without it. For more fine-grained control, pass a number between 0 and 1.0 to set how hyphen-happy the typesetter should be.
margin
Sets the internal margin within a TextFrame, effectively ‘squeezing’ the width of the Text object by a given number of canvas units. Passing a floating point value moves the left margin ‘inward’ by that distance. Passing a list or tuple of two floats will inset the left and right margins respectively. Make sure your combined margins are smaller than your Text’s width or glyph-salad will result.
spacing
Controls the amount of vertical space added before and after each paragraph (note that this is in addition to the current line-to-line leading). Passing a floating point value will add that many em-units of padding to the top of the paragraph. Passing a list of two floats will set the top- and bottom-padding respectively.
leading
Controls the spacing from baseline-to-baseline in multi-line text runs. The value is a floating point number representing the distance as a multiple of the current font size. The default leading is 1.2 (120% of the font size), but you may wish to increase this when typesetting a particularly wide measure.
Context Manager
The layout() command (and the Font object it returns) can both be used as part of a with statement. Changes to the layout-style will be applied at the beginning of the code block, then restored to the previous style at the end.
Returns
Tutorial
Example
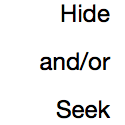
layout(align=RIGHT, leading=2)
text(10,22, 100, str="Hide and/or Seek")
paginate()
Syntax
paginate(str, x, y, width, height, **options)
Generate Text objects for a string with the given x/y and width/height
paginate(x, y, width, height, str="", **options)
The string can be omitted as the first arg if provided as a keyword argument
paginate(x, y, width, height, xml="", **options)
If an xml string is passed as a keyword argument, its tags will be mapped to font definitions in the canvas’s Stylesheet
paginate(x, y, width, height, src="<path or url>", **options)
Load the file pointed to by the src argument and draw its contents
paginate(Text, folio=1, verso=None)
Generate pages from an existing Text object
Description
Returns a generator which yields one or more Text objects with a fixed position and size. The syntax is identical to that of the text() command, but rather than drawing to the canvas it returns the resulting Text objects for your script to plot() manually.
The paginate() command can be useful when drawing long passages of text that may not fit in a single text block (or on a single canvas frame). The objects it returns are standard Text objects but contain two additional ‘counter’ attributes that may be useful during layout:
txt.folio # the "page number" of the object (typically counting from one)
txt.pg    # the index of the object in the series (counting from zero)
Optional Parameters
folio
Sets the ‘page number’ of the first Text object in the sequence – accessible through its corresponding .folio attribute. Subsequent objects in the sequence count up from there. Defaults to 1 if omitted.
verso
Pass a 2-tuple to set x/y coordinates for ‘even’ pages in the sequence. If omitted, all the Text objects will use the same x/y position as defined in the positional arguments.
Returns
an iterable generator of Text objects (as many as needed to fully lay out the string)
Tutorial
Example
with export('~/book.pdf') as book:
    size(340, 450)

    for txt in paginate(40,40, 600,800, src='~/Documents/war-and-peace.txt'):
        with book.page:
            plot(txt)
            text(WIDTH/2, 430, align=CENTER, size=9, str=txt.pg+1)
stylesheet()
Syntax
stylesheet("name", *font, **options) # define a style
stylesheet("name") # retrieve a preexisting style
stylesheet("name", None) # undefine a style
Description
Part of the canvas’s state is a global Stylesheet object which is used by the text() command to format strings with XML-delimited inline styles. The stylesheet() command allows you associate font() and layout() settings with names. You can then apply these attributes to a portion of your string by enclosing it in an XML element using the same name.
Defining Styles
The first argument is a string defining the new style’s name. All subsequent arguments will be interpreted identically to the font() command’s syntax. You can use both positional and keyword arguments. For example the following are equivalent:
stylesheet('title', 'gill sans', 'bold', 22, italic=True)
stylesheet('title', size=22, family='gill sans', italic=True, weight='bold')
Paragraph layout options can also be added to styles using the same set of arguments supported by the layout() command. Note that in PlotDevice, paragraph settings are ‘winner take all’ for each "\n"-separated line of text. So whatever the paragraph style is set to for the first character of that line will apply until the next carriage return.
Once you’ve defined a style, you can refer to it when calling the text() command, either by using the style name as a tag within some xml input, or by passing a style keyword argument to be applied to an entire string:
text(40,40, xml="<title>Ignite the seven cannons!</title>")
text(40,40, str="Ignite the seven cannons!", style="title")
Styles ‘cascade’ in the same way as CSS definitons. Rather than fully specifying your styles, you can have each tag modify only a subset of attributes. Omitted attributes will be ‘inherited’ from other enclosing style tags or, ultimately, the canvas’s current font() and layout() settings.
Accessing Styles
The Stylesheet stores individual styles as dictionaries of attributes. If your script needs access to the properties set by a previously defined style, call stylesheet() with the style name as the sole argument. It will return the dictionary associated with the name.
stylesheet('serif', 'Adobe Garamond', 'semibold', 11)
print(stylesheet('serif'))
>>> {'family': u'Adobe Garamond Pro', 'weight': 'semibold', 'size': 11}
Discarding Styles
Should you need to remove a style defined earlier in the script, call stylesheet() again with None as the new value for the tag name you’re undefining:
stylesheet("big-mistake", None)
Returns
Tutorials
Example
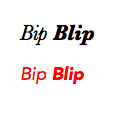
markup = "<it>Bip <bf>Blip</bf></it>"
stylesheet("it", italic=True)
stylesheet("bf", weight='black')
with font("Baskerville", 22):
    text(20,40, xml=markup)
with font("Avenir", 18), fill('red'):
    text(20,80, xml=markup)
textpath()
Syntax
textpath(txt, x, y, width=None, height=1000000, **options)
Description
Works exactly like the text() command, except it returns a Bezier rather than drawing to the screen. You can use the Bezier with commands like clip(), mask(), or plot(). You can also access the inner and outer strokes of the individual glyphs by iterating through its contours property.
Returns
Alternate Syntax
You can also generate a Bezier with the text() command’s outline parameter:
pth = text("Antitoi Bros. Video", 20,100, outline=True, plot=False)
Alternatively, use a bezier() context to capture the path in a local variable:
with bezier(20,100, plot=False) as pth:
    text("Enfield Tennis Acad.", 0,0)
... # use the Bezier object in pth
Tutorial
Example

font("Helvetica", 65)
path = textpath("clip", 10, 70)
with clip(path):
    image("header.jpg", -300, -150)
Objects
Family
Syntax
Family(famname)
Description
Represents a family of font files installed on your system. Create a Family by passing a name string as the first argument. The name will be case-insensitively matched against the list returned by the fonts() command.
The object’s properties allow you to examine available weights and styles, which can help you craft calls to the font() command.
Properties
fam.name     # canonical family name
fam.fonts    # dictionary of `face`-name keys and Font object values
fam.weights  # tuple of valid weight names
fam.widths   # tuple of valid widths (if any)
fam.variants # tuple of valid variants (if any)
fam.has_italic
fam.encoding
Font
Syntax
Font(family, weight, size, italic=False, **options)
Description
Font objects are returned by the font() command or can be created directly by calling the constructor with the same argument syntax as the font() command. Once you have a reference to a Font object, its properties provide information about character-styling, font metrics, and layout settings.
The object’s ‘Family Properties’ are aliases to the eponymous properties in the Family type and will allow you to examine the set of weights and variants supported by the current font’s family.
Context Manager
Font objects support the Python with statement and will set the canvas’s global font, font-size, leading, etc. for the duration of an indented block of code. At the end of the block, the canvas’s font-state will be restored to its prior value.
Font Metric Properties
fnt.ascender
the distance (in points) from the baseline to the tallest ascender in the font
fnt.descender
the distance from the baseline to the bottom of the lowest descender in the font
fnt.xheight
the distance from the baseline to the tops of lower-case letters
fnt.capheight
the distance from the baseline to the tops of upper-case letters
Line Layout Properties
fnt.size
the font’s point size (a.k.a. ‘1 em’) as a floating point number
fnt.leading
the distance from baseline to baseline (expressed in multiples of an em)
fnt.tracking
the amount of extra space to insert between characters (in thousandths of an em)
fnt.hyphenate
a number between 0 and 1 dictating how eagerly hyphens should be inserted to break lines
fnt.align
the text alignment (either LEFT, RIGHT, CENTER, or JUSTIFY)
Typeface Properties
fnt.family
name of the font’s family (e.g., ‘Avenir Next’ or ‘Adobe Jenson Pro’)
fnt.weight
name of the font’s current weight (e.g., ‘light’, ‘semibold’, ‘black’)
fnt.width
name of the font’s width (e.g., ‘condensed’) or None if only a single width is defined
fnt.variant
the ‘non-standard’ portion of the font’s name (if it eschews the more typical weight, width, and italicization naming scheme)
fnt.italic
a boolean flag indicating italicization or obliqueness
fnt.face
the ‘PostScript name’ which uniquely identifies the font
fnt.features
a dictionary of OpenType ‘features’ that have been enabled for the font
Family Properties
fnt.weights
a list of all the valid weight names in the given font’s family
fnt.widths
a list of all the valid width names in the given font’s family
fnt.variants
a (possibly empty) list of other variants in the given font’s family
fnt.siblings
a dictionary of ‘PostScript names’ and Font objects for the given font’s family.
Example
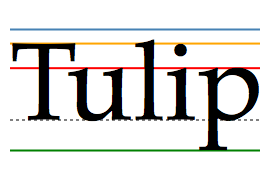
f = font('Palatino',110)
pt = Point(10,120)
with pen(2):
    line(pt-(0, f.ascender), stroke='steelblue', dx=250)
    line(pt-(0, f.capheight), stroke='orange', dx=250)
    line(pt-(0, f.xheight), stroke='red', dx=250)
    line(pt, dash=3, stroke='grey', dx=250)
    line(pt-(0, f.descender), stroke='green', dx=250)
text(pt, str="Tulip")
Text
Syntax
Text(str, x, y, width=None, height=None, **options)
Typeset a string with a baseline of x/y (while optionally setting a width and height for line-wrapping)
Text(x, y, width=None, height=None, str="", **options)
The string can be omitted as the first arg if provided as a keyword argument
Text(x, y, width=None, height=None, xml="", **options)
If an xml string is passed as a keyword argument, its tags will be accessible through the select() method and the tag names will be mapped to font definitions in the stylesheet()
Text(x, y, width=None, height=None, src="<path or url>", **options)
Load the file pointed to by the src argument and draw its contents
Description
The text() and paginate() commands return Text objects representing the characters being drawn. You can also create Text objects manually by calling the constructor which takes all the same arguments as the text() command (but won’t automatically add it to the canvas). You can draw Text objects manually with the plot() command.
This object has a number of properties to manipulate its geometry and many others to access the contents of long blocks of type:
Position Properties (read & write)
txt.x # horizontal position of the first character
txt.y # vertical position of the first character's baseline
txt.width  # the maximum line width before word-wrapping
txt.height # the maximum height for wrapped-lines
Layout Properties (read-only)
txt.frame   # the rectangle in which text is laid out
txt.bounds  # rectangle within the frame that contains actual text
txt.metrics # the size of the bounds Region
Note that the frame property is a Region defining the maximal layout rectangle (based on the Text object’s width and height properties). If you’ve used the flow() method to create a multi-column layout, the frame will reflect the union of all the TextBlock offsets and sizes.
The metrics property is a Size tuple containing the width and height of the laid-out glyphs (identical to what you’d get from using the measure() command). Its width will only be as wide as needed to contain all the word-wrapped text. The height reflects the total line-height (including ascenders & descenders).
Content Properties (read-only)
txt.text   # the unicode characters to be drawn
txt.lines  # a list of TextFragment objects describing each typeset line
txt.blocks # a list of one or more TextBlocks defining text-column geometry
txt.path   # a Bezier path with the traced letterforms
Substring Properties (read-only)
txt.words       # a list of TextFragment objects corresponding to distinct words
txt.paragraphs  # a list of TextFragment objects corresponding to paragraphs
txt[start:stop] # a single TextFragment object describing the character range
The TextFragment objects returned by these methods allow you to examine both the character- and layout-details of each slice of the Text.
Mutation Methods
txt.append(str, **options)
txt.append(xml="", **options)
Append additional characters to the text string. By default, the font and style will match the Text object being appended to. You can optionally include any of the styling keyword arguments supported by the text() command to override these defaults.
txt.font(*args, **kwargs)
Update the Text object’s character style (using the same arguments as the font() command). Changing the font won’t affect any characters already added to the Text but will be used as the default style for any strings passed to the append() method.
txt.layout(*args, **kwargs)
Update the Text object’s paragraph style (using the same arguments as the layout() command). Changing layout options won’t affect any paragraphs already added to the Text but will be used as the default style for any strings passed to the append() method. Note that paragraph styles only ‘kick in’ at the beginning of a new "\n"-separated line.
Introspection Methods
txt.find(pattern, matches=0)
Search the text string using regular expressions and return a list of zero or more TextFragment objects. The pattern arg can be an r'.*?'-style string or an re.compile’d regex object. You can limit the number of matches found by setting the matches arg to a positive integer. By default, portions of the string that match but aren’t visible (e.g., when the Text object is too small to fit the entire string) will be omitted from the return value. Setting matches to all will return every matching portion of the text, visible or not.
txt.select(tag_name, matches=0)
Search the string for regions contained within named elements (useful if text() was called with an xml keyword argument). Returns a list of TextFragment objects providing the character-range of the match as well as the layout geometry at the block- and line-level. The matches argument has the same filtering effect as in the txt.find() method.
Text-flow Methods
txt.flow(columns=all, layout=None)
If the Text object has both a fixed width and height, it’s possible that the string won’t fit entirely inside its frame. Iterating over the return value of flow() will step through as many TextBlock objects as are necessary to fully present the text.
Within your loop you can set the x, y, width, and height of each block in turn (starting from the first ‘overflow’ block). The x and y coordinates are relative to the Text object’s position, so setting them to zero moves you back to the original origin.
Each block uses the dimensions of the prior block as its default, so it’s totally reasonable to e.g., set positions using relative values:
txt = text(40,40, 200,500, str="something really long...")
for block in txt.flow():
    block.x += block.width + 50
By default the flow loop will continue until the entire string has been laid-out. But if you know ahead of time that you only want a specific number of columns, pass an integer as the column arg to set the total number of desired blocks (including the initial block defined by the Text object).
The optional layout argument allows you to pass a reference to a function that accepts a single TextBlock. The function will be called once for each block in the sequence:
def rightward(block):
    block.x += block.width + 50
text(40,40, 200,500, str="something really long...").flow(rightward)
txt.overleaf()
Returns a Text object containing any ‘overflow’ characters that did not fit within the Text’s width & height frame. If the entire string fits within the frame, returns None. See also: the paginate() command.
txt.copy()
Return a copy of the Text object with the same contents, layout, and styling.
TextBlock
Description
The Text objects you create using the text() command contain a series of one or more TextBlock objects which define the geometry used for layout. By default, each Text has only a single TextBlock with an ‘offset’ position of (0,0) and the same width/height as the Text object itself.
You don’t need to create TextBlocks manually; instead you’ll encounter them when working with Text objects. Calling a Text object’s flow() method will create a linked series of TextBlocks and allow you to position and size each of them by looping over the values it returns. Once you’ve flowed a run of text, you can refine or inspect the geometry using the Text object’s blocks property.
Properties (read & write)
txt.x # horizontal offset from the Text object's origin
txt.y # vertical offset from the origin
txt.width  # maximum line width before word-wrapping
txt.height # maximum height for wrapped-lines
txt.offset # the block's x/y as a Point relative to the parent Text's position
txt.size # the block's width/height as a Size
Properties (read-only)
txt.idx # the block's order within the flow sequence (as an integer)
txt.text # the string (or substring) displayed in the block
txt.frame # a Region with the block's screen position and size
txt.bounds # the Region within the bounds that is actually filled with text
txt.metrics # the Size of the text being displayed in the block
txt.lines a list of LineFragments describing each typeset line within the block
txt.path # a Bezier path with the traced letterforms
TextFragment
Description
The Text objects you create using the text() command are still ‘live’ objects that can provide information about their contents and layout. The Text object’s substring properties allow you to slice out portions of the text by returning TextFragment objects that describe their character and geometry data.
Each TextFragment object represents a contiguous range of characters in the Text object’s string and describes their layout (whether it lies on a single line, a range of lines, or even across multiple TextBlock ‘columns’. Depending on which property you retrieve the match from, different TextFragment properties will be relevant:
Character-range Properties
match.start # the index of the first character in the match
match.end   # the index of first character after the match
Geometry Properties
match.baseline # the origin Point of the first glyph in the match
match.frame    # Region containing the full lines of the matched range
match.bounds   # Region containing just the matched characters
Content Properties
match.text   # the substring that was matched
match.lines  # list with one TextFragment per line within the matched range
match.blocks # list with the TextBlock(s) containing the matched range
match.path   # Bezier object with the glyphs from the matched range
Regular Expression Properties (via Text.find())
match.m           # regular expression Match object
match.group(idx)  # TextFragment corresponding to the numbered or named group
match.groups()    # list of TextMatch objects corresponding to regex captures
match.groupdict() # dictionary mapping captured group names to TextMatch objects
XML Element Properties (via Text.select())
match.tag     # string with the matched element's name
match.attrs   # dictionary with the element's attributes (if any)
match.parents # tuple with the parent, grandparent, etc. tag names
Example
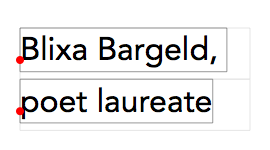
font('avenir', 32)
layout(leading=1.6)
t = text(20,60, 230, str='Blixa Bargeld, poet laureate')

nofill()
for slug in t.lines:
    rect(slug.frame, stroke=.9)  # faint
    rect(slug.bounds, stroke=.6) # dark
    arc(slug.baseline, 4, fill='red')
Legacy Commands
align()
Syntax
align(style=LEFT)
Description
Sets the alignment used by the text() command. Valid style arguments are LEFT, RIGHT, CENTER, or JUSTIFY. When calling text() without specifying a width argument, its x & y coords will determine the left-, right-, or center-point of the line of text (based on the alignment).
Calling text() with a width argument will lay out a column of type. Text in a column wraps across multiple lines within the rectangle defined by the x/y/w/h dimensions and the align() setting controls how lines are broken within this block.
Returns
PlotDevice Equivalent
The layout() and text() commands can both be called with an align argument to set the text alignment.
Example
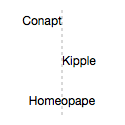
x = 62
line(x,10, x,115, dash=3, stroke=.7)
font(12)
align(RIGHT)
text("Conapt", x,25)
align(LEFT)
text("Kipple", x,65)
align(CENTER)
text("Homeopape", x,105)
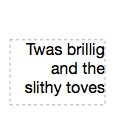
quip = "Twas brillig and the slithy toves"
x,y = 10,55
font(16)
align(RIGHT)
t = text(quip, x,y, width=95, height=65)
rect(t.frame, dash=3, stroke=.7, fill=None)
fontsize()
Syntax
fontsize(size)
Description
Sets the current font size. All text() commands following the fontsize() command will be drawn in this font size. Font size is measured in units of points.
Returns
PlotDevice Equivalent
The font() command can be called with a numeric value to set the point size.
Example
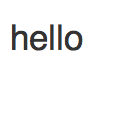
fill(0.2)
font("Helvetica")
fontsize(35)
text("hello", 10, 50)
lineheight()
Syntax
lineheight(height=None)
Description
Sets the line spacing of text in a block. Text in a block wraps across multiple lines when the width parameter of the text() command is specified. The default lineheight is 1.2 (120 percent of font size).
Returns
PlotDevice Equivalent
The layout() and text() commands can both be called with a leading argument to set the lineheight.
Example
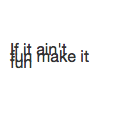
fill(0.2)
fontsize(16)
lineheight(0.4)
quip = "If it ain't fun make it fun"
text(quip, 10, 55, width=80)
textheight()
Syntax
textheight(txt, width=None, **options)
Description
Returns what would be the height of a text block drawn with the text() command given the current font() and layout() settings. The first parameter sets the text string to measure. The optional second parameter sets a word-wrap margin and measures the resulting text block. The textheight() command also accepts the same optional keyword arguments as the text() command.
Returns
PlotDevice Equivalent
The measure() command will return a Size when called with a string or a Text object as its first argument.
Example
font("Courier New")
h = textheight("hello", 30)
print(h)
textmetrics()
Syntax
textmetrics(txt, width=None)
Description
Returns what would be the width and height of a text block drawn with the text() command given the current font() and layout() settings. The first parameter sets the text string to measure. The optional second parameter sets a word-wrap margin and measures the resulting text block. The textmetrics() command also accepts the same optional keyword arguments as the text() command.
Returns
PlotDevice Equivalent
The measure() command will return a Size when called with a string or a Text object as its first argument.
Example
font("Courier New")
w, h = textmetrics("hello", 30)
print(w)
print(h)
textwidth()
Syntax
textwidth(txt, width=None)
Description
Returns what would be the width of a text block drawn with the text() command given the current font() and layout() settings. The first parameter sets the text string to measure. The optional second parameter sets a word-wrap margin and measures the resulting text block. The textwidth() command also accepts the same optional keyword arguments as the text() command.
Returns
PlotDevice Equivalent
The measure() command will return a Size when called with a string or a Text object as its first argument.
Example
font("Courier New")
w = textwidth("hello")
print(w)