PlotDevice is built on PyObjC, a bridge between the Python and Objective-C programming languages. PyObjC’s main use is writing Cocoa applications for OS X in pure Python.
Cocoa is a set of ‘frameworks’ that allow developers to create graphical applications with a typical Macintosh look-and-feel. Its two main libraries (Foundation Kit and Application Kit) are bundled with the operating system. If you know a little PyObjC it’s easy to start playing around with all the magic in OS X, right from your PlotDevice script.
This tutorial contains advanced material.
AppKit manual
The first thing you’ll notice about AppKit is that it has a lot of long, oddly-named classes all beginning with NS: NSBezierPath, NSRect, NSImage, and so on (the NS stems from the fact that AppKit is a direct descendant of NeXTstep, the ’90s technology that revitalized Apple in the ’00s).
Crazily-verbose commands like
layoutManager.drawGlyphsForGlyphRange_atPoint_(
    glyphRange,
    (x-dx, y-dy-self.font.defaultLineHeightForFont())
)
are common. So the first thing to do is get a manual. If you’ve installed Xcode, it provides a totally reasonable documentation viewer accessible through the Help menu. On the web you can find Apple’s AppKit & Foundation references.
AppKit rules of thumb
Apple’s documentation lists all of the objects in their Objective-C form. To use them in Python, you have to do a bit of name-mangling to deal with the syntax differences. Each method’s documentation begins with a ‘selector’. For example, NSFontManager has a method with the selector:
fontWithFamily:traits:weight:size:
To figure out its PyObjC name, replace the colons with underscores, then pile all the arguments at the end (between parentheses). For instance, calling our NSFontManager would look like:
NSFontManager.fontWithFamily_traits_weight_size_(fam, traits, wgt, sz)
Another place where you need to work around the differences between Python and Obj-C is object instantiation. Cocoa objects use a two-phase procedure in which you first create an object with object = Class.alloc() and then initialise them with object.init() or a specialized initializer like object.initWithARangeOfParamaters_(…).
Also note that many struct-like things in Foundation (like NSSize or NSRect) can have simple Python tuples substituted for them.
To start using AppKit in PlotDevice simply import the library:
from Appkit import *
Now let’s look at some of the things you can do with AppKit.
Playing sounds
The NSSound object in AppKit provides a very easy way to play AIFF and WAV sound files in Mac applications. The class below is a PlotDevice wrapper for NSSound.
from AppKit import NSSound

class Sound:
    def __init__(self, file):
        self._sound = NSSound.alloc()
        self._sound.initWithContentsOfFile_byReference_(file, True)
    def play(self): self._sound.play()
    def stop(self): self._sound.stop()
    def is_playing(self): return self._sound.isPlaying()
As you can see our Sound class takes a file parameter (that is the location of your sound file) and returns an object with a number of methods:
- sound.play(): start playing the sound
- sound.stop(): stop playing
- sound.is_playing(): returns True when playing
woof = Sound("dog.aiff")
woof.play()
The following class defines a simple sound mixer/timeline. It has a number of channels that play sounds at a defined time.
from time import time

class Mixer:
    def __init__(self, channels=4):
        self.channels = [[] for i in range(channels)]
        self.start = time()
        self.playing = []
    def queue(self, channel, time, file):
        self.channels[channel].append( (time, Sound(file)) )
        self.channels[channel].sort()
    def play(self):
        now = time() - self.start
        for ch in self.channels:
            if len(ch) > 0 and ch[0][0] < now:
                self.playing.append(ch[0][1])
                ch[0][1].play()
                del ch[0]
    def stop(self):
        for sound in self.playing:
            sound.stop()
        self.playing = []
        self.channels = [[] for ch in self.channels]
Queueing multiple sounds is now very easy:
m = Mixer(2)
m.queue(0, 0.0, "woof.aiff")
m.queue(0, 0.4, "woof.aiff")
m.queue(0, 0.8, "woof.aiff")
m.queue(0, 1.2, "woof.aiff")
m.queue(1, 0.4, "meow.aiff")
m.queue(1, 1.2, "meow.aiff")
m.play()
speech synthesis
The example below wraps the NSSpeechSynthesizer in two PlotDevice commands. The voices() command returns a list of all available voices. The say() command makes PlotDevice speak out a sentence. The optional voice parameter sets the voice you want to use.
from AppKit import NSSpeechSynthesizer

def voices():
    voices = NSSpeechSynthesizer.availableVoices()
    voices = [x.split(".")[-1] for x in voices]
    return voices

def say(txt, voice=None):
    if voice in voices():
        voice = "com.apple.speech.synthesis.voice."+voice
    else:
        voice = NSSpeechSynthesizer.defaultVoice()
    speech = NSSpeechSynthesizer.alloc().initWithVoice_(voice)
    speech.startSpeakingString_(txt)
Now say hello in a random voice:
say("hello", voice=choice(voices()))
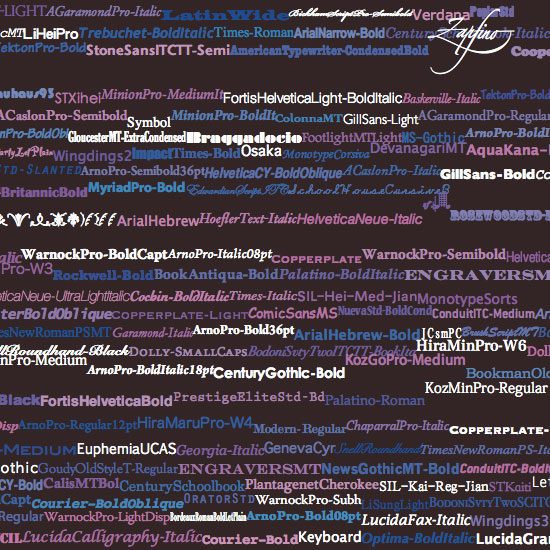
Ransom Note Typography
The command below wraps the NSFontManager object. It returns a list with the PostScript name of each font installed on your system. It’s similar to the built-in fonts() command, but it returns every individual weight and style rather than organizing things into ‘families’. Thanks to Mark for this one.
from AppKit import NSFontManager

def everyfont():
    return NSFontManager.sharedFontManager().availableFonts()
Now you can do lots of fun typography:
background(0.15, 0.1, 0.1)
font(14, leading=1.0)

x, y, h = 0, 0, 0
for f in everyfont()[:80]:
    font(f)
    width, height = measure(f)

    # Random pink, blue or white color
    fill(random(), random(0.5), 0.75)
    if random() > 0.8: fill(1)

    # Wrap text to the next line
    if x + width > WIDTH:
        x = 0
        y += h
        h = 0

    text(f, x, y)

    # Line height is equal to biggest font
    h = max(h, height)
    x += width